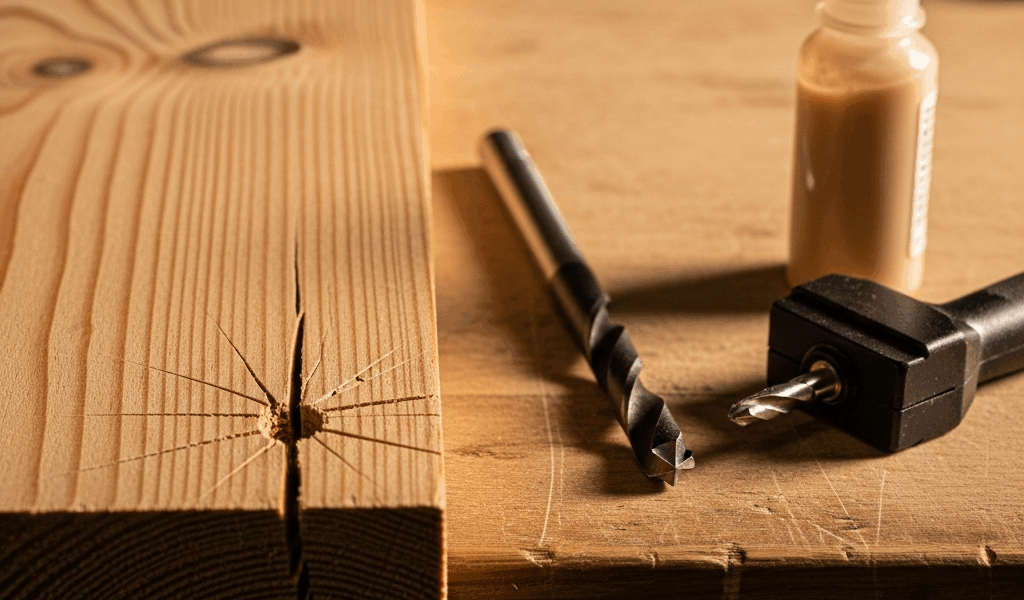
Why Wood Splits Near Edges in the First Place
Edge splitting has gotten complicated with all the bad advice flying around woodworking forums. Everyone’s got a trick. Most of them miss the actual problem.
As someone who’s spent years building furniture and fixing other people’s mistakes, I learned everything there is to know about what actually happens when a screw meets a board edge. Today, I will share it all with you.
So what is edge splitting, really? In essence, it’s a mechanical failure — the screw threads push outward as they turn, generating lateral pressure the wood simply can’t redistribute. But it’s much more than that. Near a board’s edge, there are no neighboring fibers to absorb the load. End grain zones carry the full pressure alone. Something gives. Usually loudly.
I learned this the hard way, honestly. Years back, building a simple bookshelf, I drove a 2.5-inch deck screw about 1.5 inches from the edge of a pine rail. Clean split. Spent an entire afternoon — a Saturday afternoon, no less — gluing and clamping instead of moving forward. Don’t make my mistake.
Three things cause most edge splits: a pilot hole that’s too small or shallow, the wrong screw type, and no sequence strategy near edges. Fix those three, and splits become genuinely rare.
Get Your Pilot Hole Size and Depth Right
Probably should have opened with this section, honestly. The pilot hole is everything when you’re working near edges.
For hardwoods — oak, maple, walnut — drill a pilot hole matching roughly 85–90% of the screw’s minor diameter. That’s the narrowest measurement across the shaft, between the threads. For softwoods like pine or spruce, drop that to 70–80%. This isn’t guesswork. It’s the difference between a screw doing its job and acting like a splitting wedge.
Too-small pilot holes are the number one cause I see in other people’s edge splits. The screw forces its path down, and near the edge, wood fibers fracture outward instead of parting cleanly. A pilot hole that’s slightly oversized near an edge is actually safer. The screw still bites — but without the explosive lateral pressure that pops the edge off.
Depth matters just as much. Drill your pilot hole all the way through the board if the screw passes completely through. Otherwise, stop within 1/16 inch of where the tip lands. Stop short of that, and the tip becomes its own wedge — splitting begins before the threads even engage.
For flathead screws, countersinking is non-negotiable. Most countersink bits cut at 82 degrees, which matches standard screw heads. Go slow, light pressure. Deep or crooked countersinks create stress points that invite splitting — I’ve seen boards crack just from an aggressive countersink pass on dry oak.
I’m apparently a step-drill bit convert, and a Irwin #4 step-bit works for me while standard twist bits never give me reliable depth near edges on pine. The step design lets you dial exact diameter and depth without guessing. Worth the $18.
Screw Type and Thread Pattern Make a Big Difference
Not all screws are created equal — not even close.
Drywall screws are the villain here. Fine threads, no smooth shank under the head, a sharp point that starts wedging the moment it contacts wood. They’re cheap, they’re everywhere, and people constantly grab them for furniture and trim work. Stop. Use them only for drywall. That’s the whole job.
Wood screws with a smooth shank section beneath the head work significantly better near edges. That smooth shank behaves like a small-diameter bolt — pulling pieces together rather than wedging them apart. Brands like GRK, Spax, and FastCap make screws specifically engineered to reduce splitting. They run two to three times the price of box-store commodity screws. A split board costs way more than that in time and material. That’s what makes purpose-built fasteners worth it to those of us who’ve rebuilt the same joint twice.
Square-drive and star-drive — Torx — fasteners outperform Phillips heads for this work. The bit seats deeper, transfers torque more efficiently, and slips far less. Less slipping means less excess torque converting into lateral wedging pressure. A $30 impact driver and a pack of T25 bits pays for itself the first time you avoid a split repair job.
Thread pitch also shifts the odds considerably. Fine-thread screws require less rotational torque to seat — sounds ideal until you’re near an edge where even modest pressure concentrates dangerously. Coarse-thread screws bite faster and release rotational energy sooner, cutting the window for splitting. For near-edge work, favor coarse threads. Both hardwoods and softwoods.
How to Position and Sequence Fasteners to Avoid Splits
Frustrated by the pine rail disaster and two similar failures in the same month, I started actually charting fastener position relative to edge distance on my projects. The reliable rule: keep fasteners at least two times the screw diameter from the edge. A #8 screw measures roughly 5/32 inch in diameter — so 5/16 inch minimum from the edge. Thicker hardwoods and longer screws push that number further out.
Sequence matters more than most people realize. If you’re fastening a frame with multiple screws near edges, drive the center-positioned screws first. This preloads the wood, creating internal compression that pushes outward — opposing the same direction of force the edge screws will generate. Sounds backwards. Works consistently.
Clamp before driving near edges. A pipe clamp or bar clamp holding the joint tight does two things simultaneously: compresses the fibers so they resist splitting, and stabilizes the workpiece so you can drive with deliberate, controlled pressure. Fighting a wobbling board near an edge is how splits happen in otherwise careful work.
On reclaimed barn wood or green lumber, slightly dampening the end grain before piloting opens the pores. Fibers compress instead of shattering. A damp cloth — not soaking, just damp. This saved me twice on a barn wood restoration project a few winters back. Old, dry, unforgiving material that had no business staying intact. It did.
Rescuing a Board That Already Split
Sometimes splits happen before you can stop them. The fix depends entirely on how deep and where.
Hairline splits — the kind that didn’t actually separate the board — can often be glued without removing the screw. Inject Titebond II or similar wood glue into the split using a thin applicator tip. Clamp the board to draw the faces tight, wipe excess immediately, and leave it clamped for four hours minimum. Once cured, the split closes and the repair is often stronger than the surrounding wood.
Deep splits that opened up require more work. Back the screw out — or cut it with a rotary tool if it’s truly stuck — glue the split faces, clamp fully, and let it cure before re-driving anywhere near the same zone. Repositioning the fastener an inch inboard isn’t admitting defeat. The original location is already compromised. Forcing it compounds everything. Move the hole, redrill, move forward.
For valuable or visible boards where appearance matters, CA glue — cyanoacrylate, the thin type — wicks into hairline splits and hardens in seconds. Nearly invisible when done carefully. It won’t replace structural wood glue for load-bearing joints, but for surface appearance it’s genuinely impressive. Keep a bottle of Starbond EM-02 around. That’s what I reach for.
Wood splitting when screwing near edges isn’t inevitable. It’s predictable, preventable, and fixable — once you understand the mechanics and stop skipping the boring steps that actually matter.


Stay in the loop
Get the latest wood working workshop updates delivered to your inbox.