Why Pocket Hole Tearout Happens in the First Place
Pocket hole tearout has gotten complicated with all the conflicting advice flying around. Everyone’s got a theory. Half of them are wrong.
As someone who rebuilt an entire media console last spring after watching pre-drilled holes turn into what looked like hammer damage, I learned everything there is to know about what actually causes blowout. Today, I will share it all with you.
But what is pocket hole tearout? In essence, it’s the splintered, cracked grain that appears on the exit side when your stepped drill bit misbehaves. But it’s much more than that — it’s a symptom, not a problem. Chase the symptom and you’ll ruin boards all weekend. Find the actual cause and you fix it in five minutes.
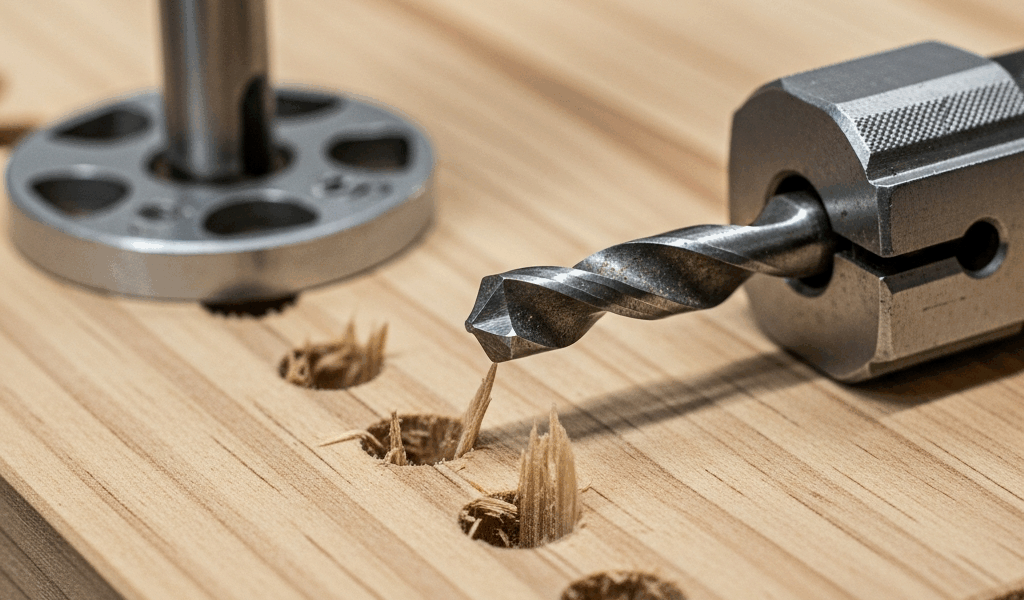
The Kreg Jig’s stepped bit does two things at once. The larger diameter end carves the pocket. The smaller pilot tip punches through to the opposite face. When either one goes sideways — literally or figuratively — you get blowout. Four specific problems account for about 95 percent of cases: wrong drill speed, bad clamp placement, a dull bit, and an incorrectly set material thickness collar. So, without further ado, let’s dive in.
Wrong Drill Speed Is Probably the Culprit
Start here. Seriously.
On hardwoods like oak or maple, running too fast — say, 2,500 RPM on a cordless drill’s highest setting — forces the bit to tear grain fibers rather than shear them. The exit hole ends up looking like a chrysanthemum. On softer stuff like pine or plywood, going too slow lets the bit wander as it exits, which also causes tearout, just with a different signature. Oval-shaped exit holes. Chipped corners. That kind of thing.
The sweet spot sits between 1,000 and 1,500 RPM for most pocket hole work. Most DIYers don’t own a tachometer — and honestly, why would you — so here’s the practical version instead.
Use your drill’s clutch ring. That numbered collar around the chuck, usually 1 through 16. Settings 2 and 3 are your pocket hole zone. The clutch slips before the bit overspeeds when it hits resistance. The drill sounds weak. Feels wrong. Works perfectly. That’s what you want.
No clutch? Ease off the trigger manually and let the bit work instead of muscling through. This takes practice — your hand will cramp before you get the rhythm. Don’t make my mistake and assume more pressure equals cleaner holes. It doesn’t.
Bad Clamp Position Lets the Workpiece Shift
Clamping placement matters more than clamping pressure. One millimeter of movement during drilling blows out the exit hole. One millimeter.
Here’s the thing most people get wrong. They clamp from behind the jig, thinking that holds the board steady. What it actually does is allow the board to rock slightly forward the moment the bit breaks through the back face. The bit catches grain at an angle. Splinters everywhere.
Clamp directly over the hole. Not behind it — over it. If you own a Kreg face clamp, model number F3 or similar, position the pad tight against the exit side of the hole. Snug, not white-knuckle tight. “Snug” means you can’t wiggle the board when you try. That’s your signal.
That’s what makes the face clamp endearing to us pocket hole people. It holds the wood fibers down at exactly the moment the bit exits — which is precisely when tearout happens. Before I used one, I’d see blowout on roughly 40 percent of joints. After, maybe 5 percent. It runs about $35 and attaches to any Kreg jig.
No face clamp? A bar clamp across the top surface, centered over the hole, gets the job done. Get the pressure point directly over the exit. Your eye can place this without any math.
Dull Bit and Wrong Material Thickness Setting
Pocket hole bits dull faster than standard drill bits. The stepped geometry, constant friction, dense materials like MDF — it adds up faster than you’d expect. Most kits ship with one primary bit and one backup. After 30 to 40 holes, you’re borrowing time on that first bit.
Test sharpness with your fingernail. A sharp cutting edge catches slightly when you drag your nail across it. A dull one feels like running your finger along glass — smooth, no grab. If it doesn’t catch, replace it. A quality Kreg replacement bit runs $8 to $12. A ruined board costs more.
I’m apparently hard on bits — I used a Kreg Blue-Kote bit through thirty hardwood pieces before switching to plywood cabinet work, and it shredded the first sheet I touched. Spent $60 on that plywood. Ten minutes cutting it down. Five seconds destroying it. Don’t make my mistake.
Probably should have opened with this next part, honestly. The material thickness collar — that small metal ring sitting below the chuck — controls how deep the bit travels before the pocket stops. Set it for ¾-inch stock but drill into ½-inch plywood and the bit blows through with too much momentum. Tearout every time.
Check the collar setting before every new job. Half-inch material gets a different position than three-quarter. The manual that shipped with your jig shows exact placement for each thickness. Read it. I know. But actually read it.
How to Fix Tearout That Already Happened
Probably should have opened with this section, honestly. Not all tearout is a death sentence.
If the joint isn’t glued yet, standard wood glue and overnight clamping can heal cosmetic damage surprisingly well. Work glue into the splintered area, reassemble, clamp tight. The glue wicks into torn grain and hardens it back together. This works on surfaces that won’t be visible or will be sanded down later.
For painted or stained pieces where the tearout is obvious, wood filler is honest work. Minwax Stainable Wood Putty runs about $4 a can. Pack it into the damaged area, let it dry fully, sand flush, then stain or paint over it. On painted work, a good color match and nobody notices.
If the tearout is structural — part of a joint that carries real weight or stress — recut the board. Full stop. Gluing grain fibers back together and trusting them under load will fail eventually, probably at the worst moment. That piece isn’t salvageable, and convincing yourself otherwise just delays the problem.
Next time, run the checklist before drilling. Clutch set to 2 or 3. Clamp positioned over the hole. Bit passes the fingernail test. Collar matches your actual material thickness. One of those four is almost always what went wrong. Find it first, fix it first, and save yourself a Saturday.


Stay in the loop
Get the latest wood working workshop updates delivered to your inbox.