Why Your Chisel Drifts in the First Place
Chisel control has gotten complicated with all the conflicting advice flying around. Bevel up, bevel down, Japanese chisels, Western chisels — everyone’s got an opinion and half of them contradict the other half. As someone who has ruined more mortises than I care to admit, I eventually learned everything there is to know about why a chisel drifts. Today, I will share it all with you.
I’ve stood at my bench staring at a mortise that looked like it was cut in the dark. Sideways, ragged, nothing like the layout lines I’d drawn with care. The chisel kept wandering no matter what I did. After enough ruined joints — and one particularly ugly box I had to quietly retire to the firewood pile — the real pattern became clear. Three things cause drift. You’re either scoring the line wrong, or not at all. Your bevel is facing the wrong direction for the cut. Or you’re trying to hog off too much wood in a single pass.
Most woodworkers blame the tool first. Dull chisel, bad handle, wrong brand. But a $15 chisel from an estate sale will track true if you set it up correctly. A $200 Japanese bench chisel will wander all over your workpiece if you don’t. Without a scored registration line, the bevel has nothing to seat against — it just rides up on the pencil mark and drifts. Wrong bevel direction and the blade angles away from your cut. Too aggressive a swing and momentum carries everything past your layout line. Fix these three things in sequence and the drifting stops. That’s the whole article, really, but let’s get into the specifics.
Fix 1 — Score the Line Before You Ever Touch a Chisel
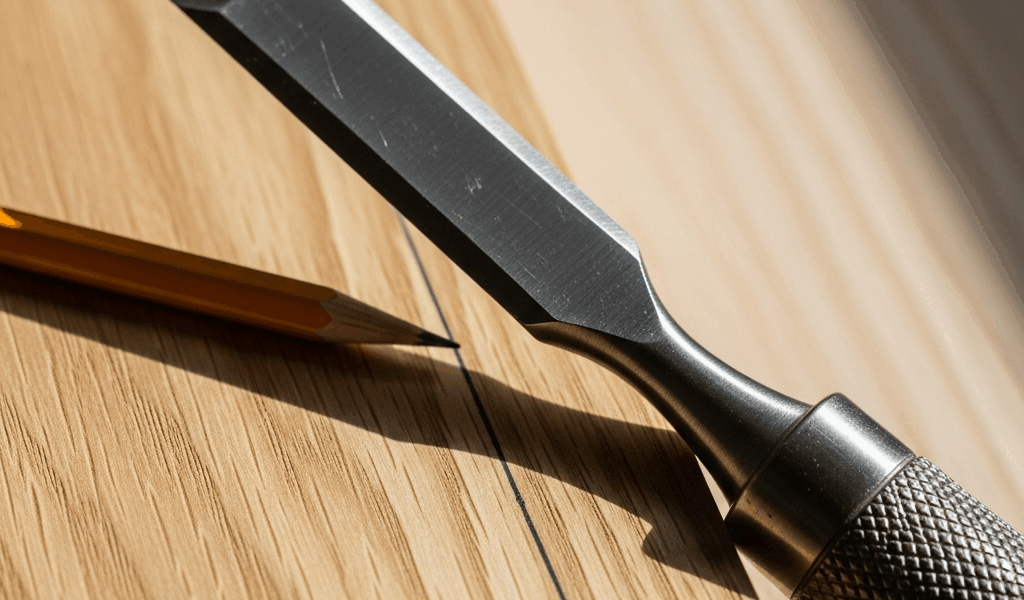
Probably should have opened with this section, honestly. This is the fix most beginners skip entirely — and it’s the one that causes about 90% of drift problems I’ve seen.
A pencil line looks so clean and precise that it feels like enough. So you pick up the chisel and start chopping. The blade rides right over the graphite like it isn’t even there. Gone in one swing.
You need a marking knife. Not a utility knife — a proper marking knife, ground to a shallow angle on one flat side only. Veritas makes a good one for around $35. Narex sells a model for about $20. I’m apparently a flea market person and a battered vintage one I paid $4 for works perfectly fine, while the cheap utility knife I tried first never tracked worth a damn. Don’t make my mistake.
Lay the knife’s flat face against the layout line — the side you’re keeping. Tilt the blade maybe 15 degrees into the surface. Draw it toward you with firm, steady pressure. You’re cutting a groove roughly 1/32 inch deep. That groove is your mechanical wall. When the chisel’s bevel seats into it, the wood itself stops any sideways movement. There’s nowhere for the blade to go.
One refinement worth knowing: if you’re removing waste on one side of the line, skew the knife slightly toward that waste when you score. It creates a small ramp that naturally angles the chisel away from your finished surface. On a mortise, score the line perpendicular to your work edge first, then score the waste-side wall with the knife canted about 5 degrees toward the scrap. The bevel seats against the perpendicular wall and wants to move toward the angled one — which is exactly where the waste goes anyway.
Fix 2 — Bevel Orientation Changes Everything
But what is bevel orientation, really? In essence, it’s the decision of which face of the chisel contacts the wood during a cut. But it’s much more than a stylistic preference — it’s physics, and physics doesn’t care what you prefer.
Bevel down means the angled face is on the bottom, touching the wood. Under mallet pressure, that geometry pulls the blade downward into the grain. Self-registering. This is your orientation for horizontal paring — taking thin shavings across a flat surface. Bevel down keeps the tool honest because the wood itself is steering it.
Flip it to bevel up and the flat back rests on the wood, angled face in the air. Now mallet pressure wants to drive the blade upward and away from the surface. That’s exactly what you need when you’re cutting a vertical wall — a mortise side, a dado in end grain, anywhere you’re driving straight down and need the blade to stay perpendicular to the surface rather than diving in.
Wrong orientation is invisible until you make the cut. Then the tool just wanders, and it feels almost personal. It isn’t. That’s what makes bevel orientation so endearing to us woodworkers — once you understand it, the tool behavior that seemed random suddenly makes complete sense. On a mortise: vertical walls get bevel up. Horizontal paring at the bottom gets bevel down. Same chisel, two jobs, two setups.
Fix 3 — Take Smaller Bites and Let the Mallet Do Less Work
I learned this the slow way — through about sixty failed mortises across three projects. Swinging hard feels productive. The wood chips fly, progress seems fast. It isn’t productive. It’s just fast chaos.
Start with light taps. Tap, tap, tap. The whole point of those first few strikes is to set the shoulder — to drive the bevel into the scored line and establish a registered wall that can’t be crossed. Three or four light strikes accomplish this. That’s all. Only after the shoulder is properly set do you increase pressure.
Once you’ve got about 1/8 inch of clean depth, you can work harder. But sharp chisels require minimal force — a dull one demands heavy swings just to move. Right there is your sharpening motivation, without turning this into an article about waterstones and stropping leather.
Trying to remove 1/4 inch of wood in a single pass builds momentum, and momentum carries the blade past your layout line every time. Smaller bites, light taps first, then deeper pressure once the walls are established. A mortise cut this way takes longer. It also comes out square, which is presumably why you were cutting it in the first place. Think of it like climbing — you don’t lunge at the next hold. You test it, weight it slowly, then commit. So, without further ado: slow down and use the knife line you already cut.
When It Still Drifts — Check Your Sharpening Angle
If you’ve scored the line with a marking knife, oriented the bevel correctly, taken light passes — and the chisel still wanders — the problem has moved to your sharpening. A hollow bevel or an inconsistent grind angle means the blade can’t seat flat into the scored groove. It rocks slightly, shifts, and drift follows.
Check the back first. Flat, not crowned. Any curve means a deeper sharpening problem that needs addressing before anything else. Then check the bevel — should be a consistent angle from corner to corner with no flat spots or twist. Run your thumb lightly along the edge and feel for inconsistencies.
Frustrated by persistent drift even after checking the bevel, I once spent an entire afternoon re-lapping the back of a Narex 3/4-inch chisel on 120-grit sandpaper taped to a piece of 3/4-inch MDF. That was a Saturday I’m not getting back. But the chisel tracked perfectly after. Sometimes it’s that simple and that tedious.
If the back is flat and the bevel is consistent and drift still happens, revisit the first three fixes — one of them wasn’t done quite right. Nine times out of ten it’s the score line. Just wasn’t deep enough.
Work through it in order: score the line, orient the bevel, take smaller bites, then check sharpening if needed. That’s the whole sequence. Your mortises will start looking like you actually meant them that way.


Stay in the loop
Get the latest wood working workshop updates delivered to your inbox.