Workshop Layout Planner
Create Your Ideal Workshop Layout for Maximum Efficiency
Setting up a workshop has gotten complicated with all the conflicting advice about tool placement and workflow flying around. I’ve set up three different shop spaces over the years, and each one taught me something the previous one hadn’t. Once I started thinking about workflow before buying a single piece of equipment, everything clicked. Here’s what I know.
Start With Workflow
Analyze the tasks you actually perform in sequence. For woodworking, the typical flow runs: rough milling, dimensioning, joinery, assembly, sanding, finishing. List out each step in your actual process — not some idealized version of it, but what you really do.

- Design area: A desk or flat surface for planning, drawing, and measuring. Doesn’t need to be large — just stable and well-lit.
- Cutting area: Table saw, miter saw, band saw. These need the most clearance — often 8-10 feet of infeed and outfeed space.
- Assembly area: A solid workbench with room around it for clamping and moving around workpieces.
- Sanding area: Near dust collection. Keep this as far from the finishing area as possible.
- Finishing area: Away from sawdust and airborne debris. Ideally a separate space or at least separated by timing.
Try to arrange the shop so materials move from one area to the next without doubling back. Backtracking with lumber wastes time and creates safety hazards.
Allocating Space by Priority
Identify which stations require the most floor area. Wish I’d thought about this more carefully in my first shop — I crammed the table saw into a corner and then spent two years fighting it every time I processed a long board.
- Main workbench: Central location, accessible from all sides if possible.
- Power tools: Usually along walls or in corners, but with adequate outfeed space extending into the floor area.
- Hand tools: Stored in cabinets or on a French cleat wall near the workbench — within arm’s reach without moving.
- Material storage: Close to the cutting area. Lumber should go from storage to the saw without traveling across the whole shop.
Ensure clear pathways throughout. You need to be able to move an 8-foot board in any direction without hitting anything. This constraint shapes shop layout more than most people realize until they’ve done it wrong once.

Equipment Placement
Table saws and band saws need significant clearance — at least 3 feet on all sides, with more for the table saw outfeed direction. Drill presses should be anchored to the floor or a heavy base to reduce vibration and prevent walking. Mobile bases are worth every dollar for heavy tools you occasionally need to reposition.
- Table saws: At least 3 feet clearance on all sides, 8+ feet for infeed/outfeed.
- Band saws: Sufficient infeed and outfeed space for the longest pieces you cut.
- Drill presses: Anchored securely, positioned so the column doesn’t block movement through the shop.
Mobile workstations on quality casters offer real flexibility. I have my bench grinder on a small rolling cart — it parks against the wall and rolls out when I need it. This approach keeps the floor clear without sacrificing access to the tool.
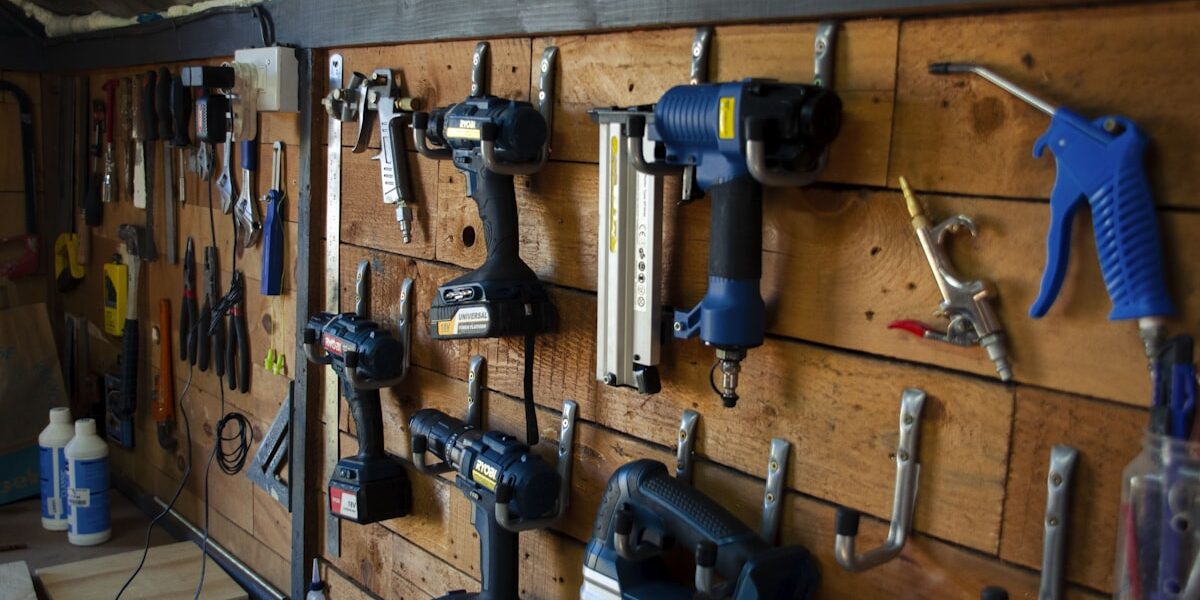
Tool Storage
A well-organized tool storage system saves time every single day. French cleat walls are my preferred approach — flexible, strong, and completely reorganizable. Pegboards work too, and they make it obvious at a glance when something is missing. Tool chests and cabinets should be close to the workbench but positioned so you don’t have to walk around them to use the bench.
Material Storage
Separate raw materials from finished pieces and work-in-progress. Store raw lumber near the cutting area. Use vertical storage racks to save floor space and keep lumber accessible — boards stored flat warp faster and are harder to pull out one at a time.
- Lumber racks: Store boards vertically or on edge, accessible from the front.
- Hardware cabinets: For screws, fasteners, and hardware — sorted by size and type.
- Sheet goods: On edge along a wall or on a dedicated rolling cart. Sheets stored flat become warped and are nearly impossible to move alone.
Keep finished pieces away from sawdust and finishing chemicals. A dedicated rack or cabinet with doors protects them from scratches and contamination.
Lighting and Ventilation
Probably should have led with this section, honestly. Good lighting is the most underrated shop improvement. Natural light is best, so position workstations near windows when possible. Augment with high-quality LED fixtures at 5000K — daylight equivalent illumination makes it dramatically easier to see grain, check flatness, and evaluate finishes accurately.
- Overhead LEDs: Ensure even lighting throughout the shop. No dark corners.
- Task lights: Adjustable arm lights for detailed work at the bench.
- Natural light: Position key stations to take advantage of window placement.
Proper ventilation keeps the environment safe and comfortable. A dedicated dust collection system connected to all major power tools is the most important investment after the tools themselves. Exhaust fans improve air circulation and are essential in a finishing area. Never work with finishes without adequate fresh air.
Electrical Considerations
Workshops require more outlets than almost any other space. High-powered tools need dedicated 20-amp or 240-volt circuits. Extension cords on the floor are trip hazards and fire hazards — plan enough outlets so you don’t need them for permanent connections.
- Standard outlets: Near workbenches and tool stations, ideally at bench height to reduce cord clutter.
- Dedicated circuits: For table saws, dust collectors, compressors, and other heavy equipment.
- Wall-mounted power strips: Reduce floor cord clutter and put outlets where you actually need them.
Safety Measures
Maintain a clean and organized environment. Sawdust on the floor is a slip hazard. Clutter blocks emergency exits and fire extinguisher access. Keep first aid kits and fire extinguishers visible and unobstructed.
- Fire extinguishers: One near the finishing area, one at the exit.
- First aid kit: Well-stocked, at a known location everyone in the shop knows.
- Tool maintenance: Regular inspection keeps tools performing safely and prevents failures.
Flexibility and Adaptability
A good shop layout evolves. The tools you buy next year may require rethinking the whole arrangement. That’s why I favor mobile bases, rolling carts, and French cleat walls — everything can be moved when the next tool or project demands a different configuration.
With these principles in place, setting up your shop becomes structured and satisfying. The goal is a space where the tools serve the work without the space fighting you every step of the way.


Stay in the loop
Get the latest wildlife research and conservation news delivered to your inbox.