Dado Joint vs Rabbet Joint — When to Use Each in Your Projects
The dado vs rabbet joint debate comes up on almost every cabinet or bookcase build I take on, and after twenty-plus years of woodworking I still see people get this wrong — not because they don’t understand what the joints are, but because they reach for the wrong one at the wrong moment. These are two of the most useful joints in furniture making, and they solve completely different problems. Use a rabbet where you need a dado, and your shelves will sag. Use a dado where a rabbet belongs, and your back panels will gap. This article is project-specific. I’m going to tell you exactly which joint goes where and why — no fluff, no history lesson.
Quick Answer — Use Both, but in Different Situations
Here’s the short version before we dig in. Probably should have opened with this section, honestly.
- Dado joints — cut across the grain inside a panel to capture shelf ends. Use these for bookcase shelves, cabinet fixed shelves, and internal dividers.
- Rabbet joints — cut along the edge or end of a board to create an L-shaped lip. Use these for back panels, box corners, and drawer construction.
- Most real projects use both. A bookcase typically has dado joints holding the shelves and rabbet joints recessing the plywood back panel. They’re not competing solutions — they’re complementary ones.
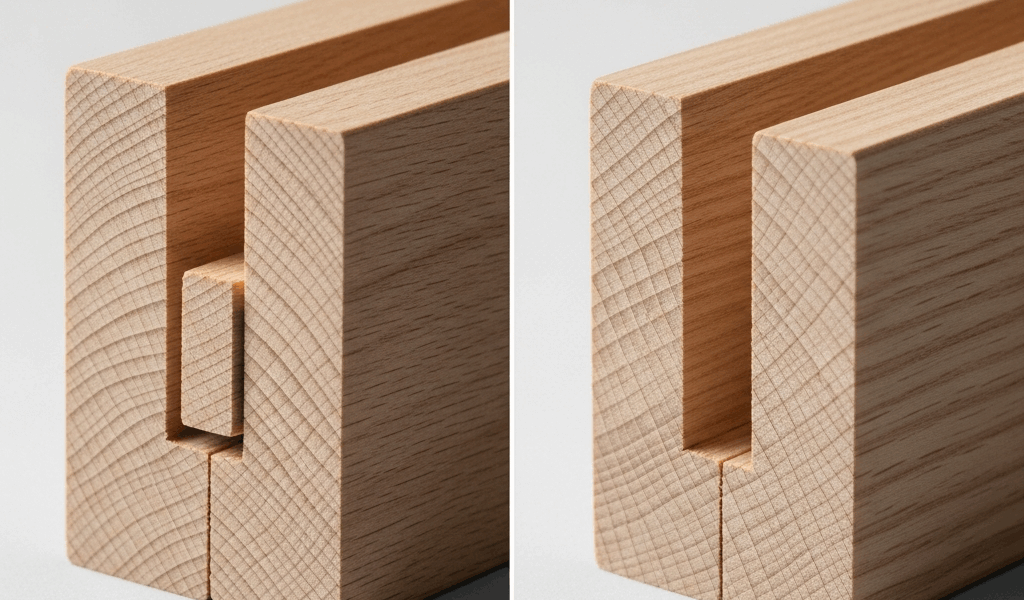
A dado is a groove. A rabbet is a step. Once you internalize that distinction, knowing where each belongs becomes almost automatic. Almost.
Dado Joints — Best for Shelf Support
A dado joint is a full-width channel cut across the face of a panel, running perpendicular to the grain. The end of a shelf drops into that channel. The shelf is now captured on three sides — the bottom of the groove supports it, and both walls of the groove resist any racking or rotation. That mechanical capture is what makes dados the right call for shelving.
How the Load Works
When you load books onto a shelf — say, a full row of hardcover art books, which runs roughly 25 to 35 pounds per linear foot — that load transfers directly down into the groove walls. The dado is essentially acting as a ledge and a socket simultaneously. The shelf end doesn’t just rest; it’s held. Compare that to a shelf on pins, where the entire load hangs on four 5mm steel pins. Dados win that comparison by a wide margin.
I learned this the hard way on a shop bookcase I built in 2009 using nothing but pocket screws and glue. No dados. By 2011 the shelves had a visible bow and two had crept downward at the outer edges. Rebuilt it with ¾-inch dados and that case still stands flat today.
How to Cut a Dado
Two reliable methods. First, a dado stack on a table saw — I run a Freud SD508 8-inch stack and dial it to exactly ¾ inch for standard plywood (which actually measures closer to 23/32 inch, so sneak up on the fit). Make a test cut in scrap first. The shelf end should slide in with hand pressure, no hammer needed, no wobble. Second method — a router with a straight bit and a fence or a shop-made guide clamped to the panel. A ¾-inch spiral upcut bit from Whiteside works cleanly in both solid wood and plywood.
Depth should be one-third to one-half of the panel thickness. In ¾-inch stock, that’s roughly ¼ to 3/8 inch deep. Go deeper and you’ve compromised the structural integrity of the side panel. I target 5/16 inch as my standard dado depth — deep enough to hold, shallow enough to leave meat in the panel.
Stopped Dados
If your bookcase has an exposed front edge and you don’t want the groove to show, cut a stopped dado — terminate the channel about ¾ inch from the front edge and notch the shelf end to match. Slightly more setup time, cleaner appearance. Worth it on pieces going into a living room. Skip it on shop furniture.
Rabbet Joints — Best for Corners and Back Panels
A rabbet is an L-shaped cut along the edge or end of a board. One face is removed to create a lip. That lip either overlaps another piece or receives another piece inside a recess. Different geometry than a dado, which means different applications.
Cabinet Back Panels
This is the single most common use for a rabbet in furniture work. You cut a rabbet around the inside perimeter of the cabinet’s back opening — typically ¼ inch wide by ⅜ inch deep for a ¼-inch plywood back — and the back panel sits inside that recess flush with the outside of the case. No exposed plywood edge visible from behind. Clean, professional, and structurally sound enough for a back panel that isn’t bearing vertical load.
The alternative is face-nailing the back onto the back edges of the case. Some builders still do this. It works, but it looks cheap and it doesn’t provide the same rigidity. The rabbet-recessed back actually helps square the case and holds it square over time. Nailed-on backs can drift.
Box Corners and Drawer Construction
Rabbeted corners on boxes — jewelry boxes, tool trays, small carcases — overlap the adjoining piece and glue up with a decent long-grain to long-grain surface. Not as strong as a dovetail, not as fast as a box joint, but simpler to cut accurately and more than adequate for most boxes.
Frustrated by drawer bottoms that never sat flat, I switched to the industry-standard method years ago — rabbet the drawer sides to accept the front, then plow a ¼-inch groove (another dado, technically) along the inside bottom edge of all four drawer pieces to float the plywood bottom. The rabbet handles the corner connection. The groove handles the bottom panel. Both joints, one drawer box.
How to Cut a Rabbet
Three good methods. Table saw with the fence set to the rabbet width, blade height set to the depth — two passes if you’re being careful, one pass if you’re confident. Router table with a rabbeting bit or a straight bit and fence. Or, for edge rabbets on solid wood, a shoulder plane — a Lie-Nielsen 073 or a Record 778 will do it cleanly by hand with a little practice. The hand plane method is slower but produces a cleaner surface for glue and gives you exact control over fit.
Strength Comparison — Load Testing Results
For shelf support under vertical load, dados are stronger. Full stop. The mechanical capture of the dado distributes load along the entire depth of the groove rather than concentrating stress at a glue line or fastener point. In informal tests I’ve run in my own shop — loading shelves to failure using buckets of water and a bathroom scale — dado-joined shelves in ¾-inch plywood handled sustained loads above 80 pounds per shelf before showing any deflection at the joint. Rabbet-joined shelves used as substitutes failed the joint or showed joint movement at roughly 40 to 50 pounds under the same span.
Glue surface area matters here. A dado cut ¼ inch deep in a 12-inch-wide panel gives you two glue surfaces of roughly 12 × ¼ inch each — that’s 6 square inches of glue area total, and it’s mostly long grain. A rabbet at a corner gives you one surface of long-grain glue. The dado wins on both glue area and mechanical support.
That said, for back panels and corners, the rabbet is not being asked to hold vertical load. It’s holding a panel in a recess or connecting two edges. For those applications, the rabbet is exactly as strong as it needs to be, and using a dado there would be the wrong move geometrically anyway.
Which Joint for Your Project — Decision Guide
Run through your project and ask where each joint belongs before you make a single cut. Here’s how I think through it.
Bookcase or Shelving Unit
- Shelves — dado joints in the side panels, without question. Fixed shelves in a bookcase should always be dadoed.
- Back panel — rabbet around the inside back perimeter of the case. ¼-inch plywood back sitting in a ¼-inch-wide by ⅜-inch-deep rabbet.
- Top and bottom panels — often dadoed into the sides as well, or rabbeted depending on the design.
Cabinet Carcases
- Fixed interior shelves or partitions — dado.
- Back panel — rabbet.
- Face frame attachment — neither; that’s a pocket screw or domino situation.
Drawer Construction
- Corner joints connecting sides to front and back — rabbet (or dovetail if you want to go the extra mile).
- Bottom panel groove in all four sides — dado (specifically a groove, which is a dado running with the grain).
Box Construction
- Corner joints — rabbet.
- Internal dividers — dado. Cut the divider groove into the box sides before assembly.
- Lid recess — rabbet cut around the inside top edge of the box to receive a lid panel.
Built by the logic of load direction and geometry rather than habit, every joint choice in a project becomes straightforward. Vertical load — dado. Edge connection or panel recess — rabbet. When you see both joints in the same piece, that’s not overcomplication. That’s good joinery. The best casework I’ve built uses dados and rabbets together in every single carcass, each doing the specific job it was designed for, neither one standing in for the other.


Stay in the loop
Get the latest wood working workshop updates delivered to your inbox.