Router Table vs Handheld Router — When You Need Each One
The Quick Answer — You Need Both, But Not at First
Router tables have gotten complicated with all the marketing noise flying around. Walk into any woodworking forum and you’ll find someone insisting you absolutely need a $600 cabinet table before you’ve cut your first dovetail. That’s nonsense. Here’s the actual answer after years of using both tools: start with a handheld router. Add a table when small-part work starts feeling dangerous or repetitive operations have you resetting the same edge guide for the fourteenth time. Done.
Probably should have opened with this section, honestly — most articles bury that verdict under six hundred words of throat-clearing that helps nobody.
The longer version goes like this. A handheld router is the more versatile tool. It goes where you need it, handles large workpieces, and does things a router table simply can’t do — not comfortably, anyway. A router table flips that equation for a specific category of work: repetitive cuts, small parts, fence-guided operations where your hands should not be anywhere near the bit. Once you’re running the same profile on fifty shelf edges or trying to safely route a piece of wood roughly the size of a playing card, the table stops being a luxury and starts being a safety item.
Both tools use the same router. A lot of beginners don’t fully absorb that. You’re not buying a new power unit — you’re buying a different way to hold and control the one you already have.
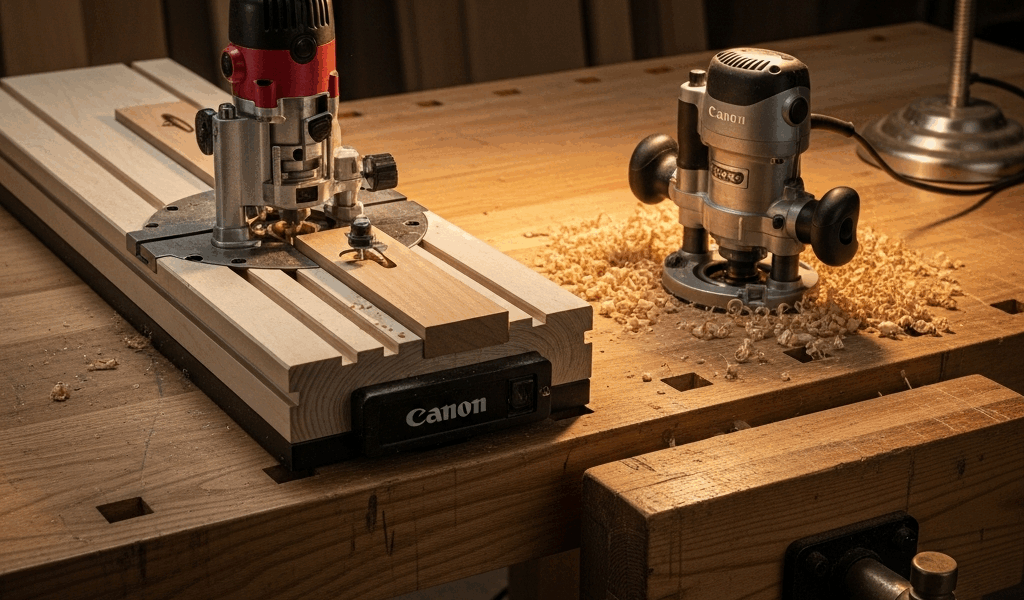
What a Handheld Router Does Better
I’m apparently a handheld-first person and reaching for the Porter-Cable works for me while the table never gets touched for certain jobs. Surprised by that even now, table sitting right there. There’s a reason for it.
Edge Profiling on Large Panels
Try routing a roundover on a full sheet of 3/4-inch plywood at a router table. Go ahead. You’ll spend the entire cut fighting that panel’s weight, trying to keep it flat against the table surface and the fence simultaneously. It’s miserable — genuinely miserable. With a handheld router and a 1/4-inch roundover bit riding a bearing against the edge, you’re done in four passes and the panel never left the sawhorses.
Large tabletops, cabinet doors over about 18 inches wide, long trim boards — all handheld territory. The workpiece stays put. The tool moves. Physics is on your side for once.
Template Routing
But what is template routing? In essence, it’s clamping an accurate pattern to your blank and letting a flush-trim bit follow it exactly. But it’s much more than that — it’s how you make ten identical curved parts without measuring ten times. Guitar bodies, arched cabinet frames, repetitive custom shapes. You make one 1/2-inch MDF template, clamp it down, and the bearing does the work.
Grabbed by a router table bit mid-cut, a workpiece with inside curves can kick out fast. On the bench with a handheld, that risk drops significantly. The workpiece is clamped. You’re moving the tool. That distinction matters enormously once you’ve watched a piece launch across a shop — and most experienced woodworkers have watched exactly that.
Mortising
Plunge routers handle mortise work cleanly. Something like the Festool OF 1400 or the more wallet-friendly Bosch 1617EVSPK — set depth in increments, make multiple passes with a spiral upcut bit, clean the square ends with a chisel. That was a Saturday afternoon revelation the first time I tried it.
Trying to mortise on a router table means either lifting a workpiece down onto a spinning cutter — awkward at best — or using a horizontal mortising attachment that most benchtop tables don’t even support. Handheld wins here. No contest.
Flush Trimming and Site Work
Any time the router needs to go to the work — trimming door hinges on an installed door, routing cable slots in a desktop, trimming laminate on countertops already bolted to the wall — you need a handheld. The table can’t leave the shop. The handheld fits in a bag. That’s the whole argument.
What a Router Table Does Better
This is where I made my mistake early on. Don’t make my mistake. I avoided building a table for two full years convinced the handheld could handle everything. Technically it can. “Technically possible” and “actually safe and repeatable” are, however, completely different things.
Small Parts — This Is the Safety Issue
Routing a piece of wood that’s 3 inches wide and 6 inches long with a handheld router is genuinely dangerous. The base plate barely has enough surface to stabilize. The bit wants to grab and spin that workpiece. Your fingers are close to the cutter. I’ve had small pieces catch and launch across the shop — twice, actually, both times routing drawer pulls freehand. Most experienced woodworkers have a similar story.
At a router table, the dynamic reverses completely. The bit is fixed. The small part passes over it with your hands safely behind the fence or pushing with a stick. Featherboards maintain consistent pressure. The workpiece rides a flat table surface instead of balancing under a wobbly router base. For parts under about 6 inches in any dimension, a router table is safer by a wide margin. That’s not an opinion — it’s geometry.
Raised Panel Doors
Raised panel cabinet doors aren’t practically possible with a handheld router. The bits run 2.5 to 3.5 inches in diameter and need reduced RPM — around 12,000 to 14,000 — with multiple shallow passes. Doing that freehand is theoretically possible and practically absurd. A router table with a fence and featherboards makes raised panel doors a routine Tuesday operation. This single use case justifies owning a table for anyone building cabinets with any regularity.
Repetitive Cuts With a Fence
Set the fence once. Run fifty pieces through. Every profile is identical. That’s what makes fence-guided repetition endearing to us production-minded woodworkers — you simply can’t replicate it with a handheld without constant re-measuring and re-clamping edge guides. Shelf pin holes, consistent chamfers on furniture legs, tongue-and-groove panels for a kitchen’s worth of cabinets. The fence is the whole point.
Joinery — Rabbets, Dadoes, Tongues, and Grooves
A router table with a quality fence — something like the Kreg PRS2100 precision system — handles rabbets and tongue-and-groove joinery faster and more consistently than almost any other method available in a small shop. The fence microadjusts. The workpiece registers flat against the table. Depth and width stay consistent without resetting between every single cut. I ran fifty drawer box rabbets in about forty minutes last fall using this setup. That same job handheld would have taken most of a day.
Build vs Buy — Router Table Options by Budget
So, without further ado, let’s dive into actual numbers — not the vague ranges that tell you nothing useful.
DIY MDF Table — Under $50
A sheet of 3/4-inch MDF cut to roughly 24 by 32 inches, a Rockler aluminum router plate (9-1/4 by 11-3/4 inches, about $40), and a fence made from a straight MDF offcut with a couple of toggle clamps from Harbor Freight — that’s a functional router table for under $50 if you have scrap wood lying around. No dust collection integration. Fence adjustments require a tape measure rather than a calibrated scale. The MDF top will move slightly with humidity changes in summer.
Built one of these in an afternoon using scrap from a shelving project. Used it for two full years before upgrading. For occasional use or someone testing whether a router table actually belongs in their workflow, it works fine.
Benchtop Router Tables — $150 to $300
The Bosch RA1181 runs around $175 to $200 — the entry-level benchtop table most small shops start with. Aluminum top, adjustable fence with dust collection ports, mounts most mid-size routers. The table isn’t large at roughly 27 by 18 inches, but it handles most joinery and edge-profiling work without complaint. The fence on the RA1181 is genuinely good for the price. That surprised me when I first used one.
The Kreg PRS2100 Precision Router Table System runs closer to $300 to $350 and adds a fence with built-in measuring scales, fine-adjust capability, and noticeably better dust collection integration. If you’re doing any production cabinet work at all, the Kreg fence pays for itself in setup time saved within the first month.
Full Cabinet Router Tables — $500 and Up
The Grizzly G1035 cabinet router table runs around $550. The Jessem Mast-R-Lift Excel II lift alone is about $400 and typically gets paired with a custom-built cabinet and phenolic top. Cabinet tables give you storage underneath, better stability, larger surface area — often 27 by 36 inches or more — and precision router lifts that let you adjust bit height from above the table with a crank rather than reaching underneath and fighting the router base.
Raised panel doors as a regular part of your work? A cabinet table with a router lift is worth every dollar. The precision on repeated depth adjustments translates directly into better-fitting panels, and you’ll feel that difference immediately.
The Upgrade Path
As someone who built a shop from essentially nothing over about eight years, I learned everything there is to know about buying tools in the wrong order. Today, I will share it all with you.
Step One — Start With a Mid-Range Handheld Router
The Bosch 1617EVSPK at around $200 is a fixed-base/plunge-base combo kit — the starting point I’d recommend to almost anyone. Accepts both 1/4-inch and 1/2-inch shanks, 2.25 HP motor that handles most bits without bogging, bases that interchange in about thirty seconds. Run it handheld for six months to a year. Learn what it does well. Learn what it does awkwardly.
Step Two — Identify the Pain Points
You’ll know a router table is necessary when specific friction points start appearing. Routing small parts feels unsafe — at least if you’re paying attention to where your fingers are. You’re running the same profile repeatedly and resetting the edge guide every single time. You’re eyeing raised panel bits that say “router table required” directly on the packaging — because they do, and for very good reason.
Those friction points are diagnostic. They tell you exactly what capability is actually missing from your setup rather than what some forum post insists you need.
Step Three — Match the Table to Your Volume
Occasional use — a few times a month, mostly joinery and small parts? Build the MDF table or buy the Bosch RA1181. It’s genuinely enough. Regular cabinet work, raised panel doors, or any kind of production run? Go straight to a benchtop unit with a quality fence, or build a cabinet table if space allows. The Kreg PRS2100 fence is the component worth prioritizing — fence quality matters more than the table itself, within reason.
Full-time or semi-professional shop producing cabinets regularly? Cabinet table with a Jessem or Woodpeckers lift, phenolic top, proper fence from the start. You’ll outgrow anything smaller quickly, and moving up later means selling equipment at a loss and buying again. I did exactly that with a benchtop unit. Cost me about $200 in the end.
One More Thing Worth Saying
The router you drop into a table doesn’t have to be your best router — at least if you’re smart about how you set up the shop. A dedicated table router, something like a Porter-Cable 890 series or an older Craftsman variable-speed unit picked up secondhand for $60, lives in the table permanently. Your primary handheld stays ready to go, collet tight, edge guide hanging on a hook nearby. That separation of duties is how experienced shops actually operate, and it eliminates the constant task of moving one router between two setups every time you switch jobs.
Start handheld. Add a table when the work demands it. Those are the two real decisions, and everything else is just picking a price point that honestly reflects how much routing you’re going to do.


Stay in the loop
Get the latest wood working workshop updates delivered to your inbox.