Why Every Workshop Needs a French Cleat Wall
Workshop storage has gotten complicated with all the “revolutionary organization systems” flying around. Pegboard panels, magnetic strips, $400 modular cabinet setups. As someone who has torn apart and rebuilt the same garage workshop three times in five years, I learned everything there is to know about what actually works. Today, I will share it all with you.
But what is a French cleat system? In essence, it’s two interlocking pieces of wood cut at 45-degree angles — one strip screwed permanently to your wall studs, the other attached to whatever holder you’re hanging. But it’s much more than that. Gravity does the actual locking. The angled cut creates downward pressure that pulls your holder tight against the wall strip. No brackets. No bolts through the wall. Just physics doing its job quietly.
Most workshops run on pegboard. I understand the appeal — cheap, familiar, hooks available at every hardware store. But pegboard fails slowly and then all at once. Hooks fall out mid-project. Holes strip and widen over time. Rearranging means new holes and patched-over old ones. Give it 18 months and your pegboard looks like Swiss cheese that also lost track of your chisels.
That’s what makes a French cleat wall endearing to us workshop obsessives. It’s infinitely reconfigurable. Your drill rack can come down next Tuesday and remount on the opposite wall in about 20 minutes. You build holders sized for your specific tools — not generic one-size-fits-nothing pegs.
So, without further ado, let’s dive in.
Materials and Cuts — Build the Base System
Probably should have opened with this section, honestly. Material selection determines everything about how your wall holds up six months from now when it’s loaded with 200 pounds of hand tools and clamps.
Buy 3/4-inch plywood. Grade A or Grade B — I prefer Grade B because yes, you’ll see knots and the occasional void, but it runs $45 to $65 per 4×8 sheet at Home Depot or Lowe’s versus nearly double that for cabinet-grade material. You’re building an industrial storage wall, not a dining room hutch. If you have a local lumber yard within reasonable distance, go there first. They’ll often rip sheets for free or charge $1 per cut, which saves real wear on your table saw and your afternoon.
Your cleat strips need to be 6 inches wide with a 45-degree bevel ripped along the entire length. One 4×8 sheet yields roughly 10 to 12 linear feet of usable cleat material once you account for the angled cut and blade kerf. That covers most single-wall workshop setups with material left over for mistakes — and you’ll make at least one.
The table saw setup matters here. Use a miter gauge or a track system. Your 45-degree angle has to stay true across the entire length of the cut. I’m apparently someone who thought they could eyeball this once — I ran two 8-foot cleats freehand with a fence that had a slight wobble, and both strips were worthless. Don’t make my mistake. Set the blade to exactly 45 degrees. Check it with a reliable digital angle gauge, not the stamped indicator on the saw itself. Run the cut slowly.
While you won’t need a full cabinet shop setup, you will need a handful of key tools. A table saw is first on that list. No table saw? Home Depot rents them for around $30 for four hours. That rental fee is the difference between finishing this weekend and finding the project still sitting in your garage next March.
Calculating your cleat length
Run your base cleats the full width of your wall section, or cut them in 4-foot to 8-foot sections for multi-wall coverage. Mine are in two 8-foot sections — that’s roughly how stud spacing works out in most residential garages built after 1980. Stud to stud. That’s the real rule. Don’t span more than 16 inches between fastening points or you’ll get sag once serious weight goes on the wall. Heavy clamps are heavier than you remember when you’re shopping for them.
Wood type alternatives
Some builders rip 2×6 or 2×8 lumber instead of plywood. Cleaner look, no exposed plies, genuinely attractive in a finished shop. The tradeoff is cost and effort — solid wood fights back harder on the saw, and an 8-foot 2×6 ripped at 45 degrees weighs enough to need a second set of hands. Plywood wins on practicality every time.
Birch plywood might be the best option if aesthetics matter to you, as workshop presentation sometimes requires a cleaner material. That is because birch plywood machines cleanly, holds screws well, and looks noticeably better than standard pine plywood — though it costs $15 to $20 more per sheet. I don’t have clients in my garage, so standard plywood does the job. Your situation may differ.
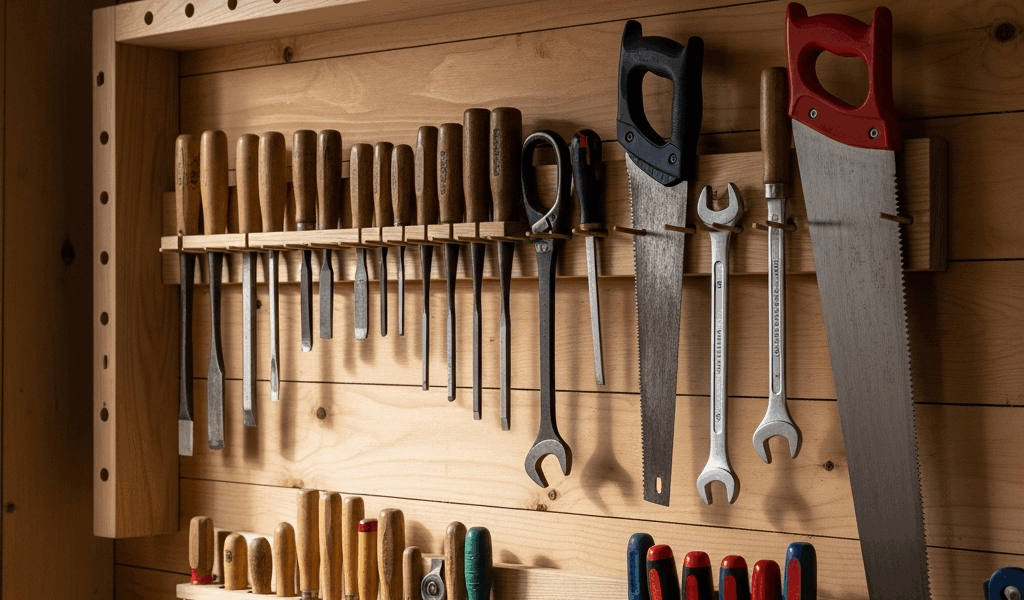
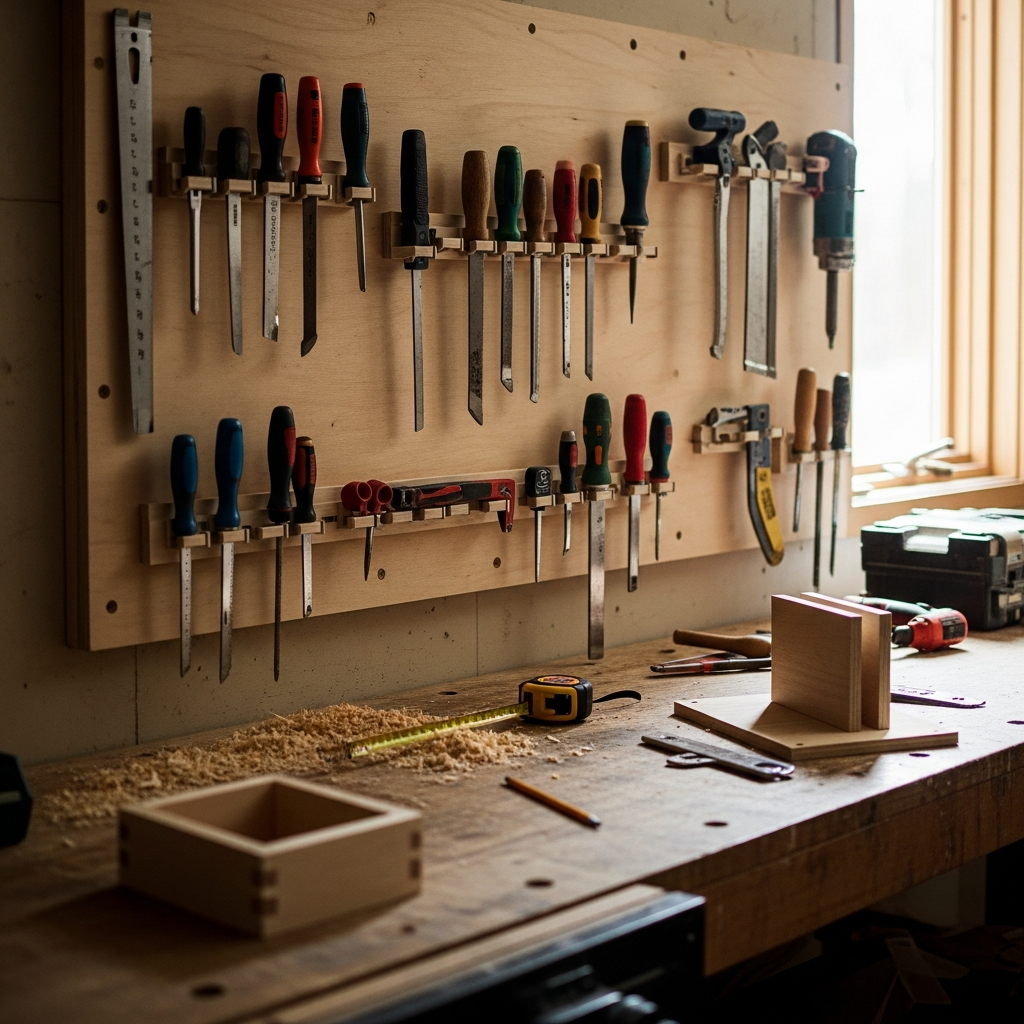
Workshop-Specific Holders to Build
This is where the system becomes actually useful. Generic French cleat tutorials show you generic shelves. What you actually need are holders built around the specific tools sitting on your workbench right now.
I built five holders over the first two weekends after mounting the wall cleats. Honestly, the holders take longer than the wall itself. But they’re also the part that makes you stop halfway through Sunday and think, okay, this was worth it.
Drill and driver holder
Start with a scrap piece of 3/4-inch plywood — roughly 10 inches wide and 8 inches tall. Drill angled holes through the face using a 3/8-inch or 1/2-inch spade bit, depending on your drill handles. Space them 3 inches apart on center. Tilt your drill press table to 45 degrees so the holes cradle the tools at an angle instead of just impaling them straight through.
My version holds six drills and four impact drivers in a footprint smaller than a piece of notebook paper. Empty, it weighs about four pounds. Add the French cleat to the back and it hangs like it’s floating an inch off the wall. Dimensions that work reliably: 10 inches wide, 8 inches tall, 4 inches deep. Any bigger wastes wall space. Any smaller and you’re squeezing tools in too tight to grab quickly.
Clamp rack
Bar clamps are impossible to store efficiently. They’re long, awkward, and fall over constantly — or at least mine did, usually onto something I’d just finished. A vertical rack solves this in about 30 minutes of build time.
Use a 24-inch vertical backer of 3/4-inch plywood. Drill 1-inch holes down the face in two columns, spaced 4 inches apart vertically, going about halfway through the thickness. Press 1-inch wooden dowel pins — the kind sold in bags of 50 at any hardware store for around $4 — into the holes. Bar clamps hang from the dowels by their handles, vertical and visible.
Twelve to 15 clamps fit in a footprint of 12 inches wide by 24 inches tall. Cost in materials: about $12. I have genuinely, out loud, said “this is priceless” in my workshop. My neighbor heard me through the open garage door and asked why I looked so happy about a clamp. That’s how good this rack is.
Hand plane shelf
Hand planes are valuable, they deserve to be treated that way, and they need protected edges. A dedicated wall shelf handles all three concerns at once.
Cut 3/4-inch plywood to 30 inches long and 10 inches deep. Route or hand-plane a 1-inch lip along the front edge — enough to stop a No. 4 Stanley from sliding off during a vibration. Sand everything to 180-grit. I finished mine with Minwax Helmsman spar urethane — two coats, light sanding between — because it protects the wood and the sheen looks intentional rather than accidental.
Add the French cleat to the back at the same 45-degree angle as everything else. Mount it at eye level. Mine holds eight planes and occupies about 3 square feet of wall space. This is the shelf you show other woodworkers. The drill rack is functional. The clamp rack is efficient. This one is the showpiece.
Chisel rack
Chisels thrown in a drawer get dinged edges and dull fast. A horizontal rack keeps them blade-out, visible, and protected without requiring a dedicated tool chest.
Use a 24-inch piece of 3/4-inch plywood as the backer. Glue strips of 1/4-inch hardboard to the face in horizontal rows, spaced 2 inches apart vertically. Each channel should run about 3 inches deep — enough to hold a chisel blade horizontally with room to grip the handle and pull it free. The finished rack runs 24 inches wide, about 14 inches tall, 4 inches deep. It holds 12 chisels in organized rows. Cost to build: roughly $15 in materials.
Hardware organizer bins
Bolts, screws, washers, and random fasteners have a way of colonizing every flat surface in a workshop. Vertical storage bins hanging from French cleats end this completely.
Rubbermaid Roughneck containers — the small rectangular ones, roughly $3 to $8 each at Walmart or Home Depot — work perfectly here. Build a plywood backer sized to your bin collection. Mine is 48 inches wide and 30 inches tall, holding 12 bins in a 3×4 grid. Screw the bins directly to the plywood. Add French cleats to the back. Done.
Labels matter here more than anywhere else. Print them clearly: “1/4-inch Machine Bolts,” “3/8-inch Flat Washers,” “Pocket Screws — 1-1/4 inch.” Spend five minutes sorting by size and type when you first mount the system. It saves hours over the following year. This single wall section replaced three rolling plastic drawers and looks about 10 times better.
Mounting to the Wall — Getting It Level and Strong
Installation is where sloppy work becomes permanent. Do it right and the wall disappears — the tools just hang there, exactly where you expect them. Do it wrong and everything leans two degrees to the left forever.
Finding studs and drawing guidelines
Use a stud finder. A Bosch or Klein Tools model costs $25 to $40 and beats trial-and-error wall damage completely. Even the $15 no-name models at hardware stores beat guessing. Mark stud locations in pencil before you pick up a drill.
First, you should draw a level line across the wall — at least if you want everything you hang to sit straight. Use a 4-foot level minimum. A 6-foot level is better for longer runs. Check it twice. I’ve been doing this for years and I still verify level lines multiple times because one mistake at this stage compounds through everything mounted above it.
Mark stud locations and your level line lightly in pencil. Use a chalk snap line for runs longer than 8 feet. Five minutes of careful layout prevents an afternoon of frustration.
Fastener selection and spacing
Use lag screws. Not drywall screws, not wood screws — lag screws, with their aggressive threads and hex heads. Specifically: 3/8-inch diameter, 3-inch length for mounting 3/4-inch plywood cleats into standard 2×4 studs. That’s 1 inch through the plywood, 2 inches into solid stud wood.
Space fasteners every 12 inches along the cleat. An 8-foot section needs six to eight lag screws. Pre-drill every hole with a 5/16-inch bit — it sounds paranoid, but it prevents splitting and makes driving significantly easier. That is because the lag threads need resistance from undisturbed wood fibers, not a compressed channel that’s already started to crack.
Weight capacity and realistic limits
A single 3/8-inch lag screw in a solid Douglas fir 2×4 holds around 300 pounds in shear. Your French cleat distributes load across its entire length. A properly mounted 8-foot cleat fastened every 12 inches handles 1,000 to 1,200 pounds of distributed weight — at least on paper.
In practice? A fully loaded drill rack weighs maybe 30 pounds. A clamp rack with 15 bar clamps runs about 50 pounds. Ten different racks fully loaded gets you to maybe 300 pounds total on an 8-foot wall. You’re fine. Very fine. But knowing the actual numbers makes you confident, and confidence makes you actually use the system instead of treating it like it might fall.
Dealing with drywall, concrete, and other walls
Standard drywall over wood studs: lag screws, as described. Concrete or block walls — common in older garages and basement workshops — need concrete wedge anchors instead. Drill into the block, set the anchors, mount the cleat. More work, same result.
On concrete, use pressure-treated 2×6 as your cleat material rather than plywood, and fasten every 8 inches. Plaster walls are trickier. Find studs behind the plaster first — they’re usually there. If you genuinely can’t locate them, toggle bolts rated for heavy loads are your only real option. They’re slower and more expensive, but they work.
The System in Practice — Rearrange When Your Shop Changes
Frustrated by a workshop layout that stopped making sense after I moved my workbench, I pulled down three holders one Saturday afternoon and remounted them 6 feet to the left. Total time elapsed: about two hours. Cost: zero dollars. That was the moment the system made complete sense to me.
That’s what makes a French cleat wall endearing to us workshop people. You’re not committed to a layout. You’re not patching holes or repainting. You unhook the holder and rehang it somewhere else.
Growing your system over time
You won’t need to build every holder in the first weekend — and you shouldn’t try. Build the wall cleats, mount them, then add holders gradually. This spreads cost over time. You’re not dropping $400 on a comprehensive system upfront. You’re spending $50 on base cleats this weekend, $15 on a chisel rack next month, $20 on a clamp rack the month after.
It also forces you to learn what you actually need. You might plan on a pegboard section for small fasteners and realize three weeks in that horizontal bins work better. Switching costs you an afternoon and maybe $12 in materials — not a wall rebuild.
And it keeps things intentional. You only build holders for tools you genuinely use. That 1/2-inch spiral upcut router bit you bought in 2019 and used once? It doesn’t get premium wall space. The tools you reach for daily get visible, organized, accessible storage.
Rearranging when your workflow changes
My workshop layout has shifted four distinct times in five years. Layout one had everything against the back wall. Layout two moved the workbench to the center. Layout three created separate milling and hand tool stations in opposite corners. Layout four is current — and I’m not calling it final, because I already have ideas about moving the assembly area.
Every shift meant moving tool storage. With the French cleat wall, that’s a half-day of work. Drive new lag screws into studs across the room, unhook the holders, remount them. Done. Try doing that with a 72-inch rolling tool chest. You’re renting a furniture dolly, recruiting a friend, and probably scratching your floor and your patience simultaneously.
Adding to the system without planning ahead
You buy a new tool — a longer level, a better random-orbit sander, a set of card scrapers. Instead of finding a drawer or clearing a shelf, you spend 45 minutes building a simple holder and mounting it to an open spot on the cleat wall.
This changes how you acquire tools. Every new purchase triggers a small build project. Fast, engaging, keeps the shop organized by forcing you to make deliberate space. Compare that to the alternative: you buy something, find a temporary spot for it, lose it in three weeks, buy another one thinking you’d misplaced it. I’ve done this with a $28 set of hex keys. Twice. The French cleat system stops that cycle.
Seasonal adjustments and seasonal tools
Winter might mean focused woodworking. Summer might shift attention to outdoor projects, deck work, or construction that uses entirely different tools. The wall adapts. Move the chisel rack to a lower-traffic zone, pull the exterior fastener bins to prime position. Takes maybe 20 minutes.
A friend who does both finish cabinetry and outdoor carpentry keeps two separate tool configurations. His wall swaps between setups depending on what season he’s working in. He says it’s the best single efficiency improvement he ever made to his shop. I believe him — I’ve seen his shop, and it runs like a well-edited sentence.
Finishing Touches and Customization
Once the cleats are mounted and your first few holders are hanging, there are some finishing details worth the hour or two they take.
Paint and finish
Painted cleats look substantially better than raw plywood — and raw plywood yellows and collects grime faster than you’d expect. I’m apparently someone who will spend an extra Saturday afternoon painting a shop wall, and Rust-Oleum’s two-part epoxy in flat gray works for me while standard latex wall paint never quite holds up to the humidity and occasional splash that workshops produce.
Paint your holders to match or coordinate. It doesn’t have to be perfect. It just has to look intentional. Spray paint laid over a drop cloth in the driveway covers holders faster than brushing and gives a more even finish on all the irregular surfaces.
Lighting
A shop that looks organized in afternoon daylight can look completely chaotic under dim overhead fluorescents at 7 PM. Add LED strip lights directly to the cleat wall surface. A 16-foot reel runs $20 to $40 on Amazon — I used a Govee warm-white strip, 2700K color temperature, which makes the space feel less industrial without sacrificing brightness. Plug it in and suddenly your tools are actually visible when you’re working late.
Labeling and organization systems
Spend one hour labeling everything. Print labels for every holder, bin, and shelf. Use a label maker — the Brother PT-D210 runs about $35 and produces clear, consistent labels that look professional and actually adhere to plywood without peeling in three weeks. Handwritten labels on masking tape look temporary because they are temporary, and temporary signals that the organization is also temporary.
Labels pay back in the first week. You grab the right thing immediately. Anyone else working in the space — a helper, a family member borrowing a tool — understands the system without a tutorial. Most importantly, the labels enforce where things go, which maintains organization without requiring willpower.
Vertical space planning
Use the full height of the wall. Mount taller, heavier holders lower. Put frequently accessed tools at eye level and reach height. Push rarely needed items up high.
The common mistake is treating the French cleat wall like a pegboard and spacing everything evenly across the surface. Instead, group related tools and let ergonomics drive the layout. Planes at eye level where you’ll appreciate them. Fastener bins directly above the workbench where you’ll reach for them mid-project. Clamp rack within arm’s reach of the assembly area. The layout should reflect how you actually work, not how a storage system advertisement looks.
The Real Why — Build This Weekend
A French cleat wall changes a workshop from a space you tolerate into a space that actively helps you work. The difference between digging through a pile for the right drill bit and seeing every tool you own at a glance isn’t subtle. It affects every hour you spend in that room.
One weekend. Under $200 in materials — closer to $120 if you buy Grade B plywood and already own the basic tools. The ROI starts the first Monday morning you walk in, know exactly where your tools are, and start working in under two minutes instead of spending the first 20 looking for things.
And honestly, it’s satisfying to build. You’ll finish Sunday evening, stand back, and feel a specific kind of pride that comes from solving a real problem with your own hands. That’s not nothing.
Build the French cleat wall this weekend. Your future self — the one who can actually find the 3/8-inch socket on the first try — will appreciate it.


Stay in the loop
Get the latest wood working workshop updates delivered to your inbox.