Jointer Leaving Scallops on Wood — Fix It Now
Jointer scalloping has gotten complicated with all the conflicting advice flying around. Slow your feed rate. Replace your knives. Call a technician. Meanwhile your boards look like a washboard and you’ve burned half a Saturday getting nowhere. I spent an entire morning chasing this problem on my 6-inch Grizzly — tried three different fixes before realizing I’d been diagnosing it wrong from the start. Today, I’ll share everything I know about it.
Here’s the thing most woodworkers miss: the scallop pattern itself is diagnostic. It’s telling you exactly what’s wrong. Read it correctly and you skip straight to the fix. Read it wrong — or ignore it entirely — and you’re just turning knobs at random.
So, without further ado, let’s dive in.
What Your Scallop Pattern Is Actually Telling You
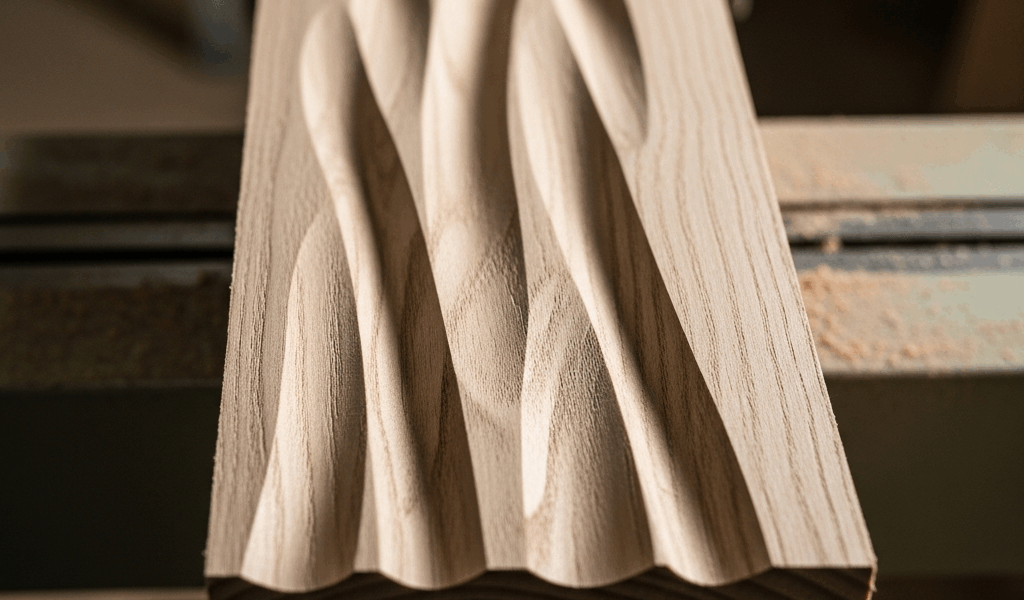
But what is scalloping, really? In essence, it’s a repeating wave pattern left on the board surface by the cutterhead. But it’s much more than that — it’s a map of your specific problem, if you know how to read it.
Widely spaced, shallow scallops — usually 3 to 6 inches apart — mean feed rate. You’re pushing the board faster than the knives can cleanly handle, so each rotation leaves a visible bite. Feels obvious in hindsight. Almost nobody guesses it first.
Tight, evenly spaced scallops — a quarter-inch to a half-inch apart, consistent across the whole board — point to dull knives or uneven knife height. Same knife, same height mismatch, same mark stamped over and over on every single pass.
Scallops only at the tail end of the board — that’s outfeed table height, almost without exception. The board drops slightly as it exits the knives. You see the damage right where the wood loses support.
That’s what makes pattern-reading endearing to us woodworkers — you stop guessing and start actually solving things.
Check Your Outfeed Table Height First
Probably should have opened with this section, honestly. It’s the most common cause and — this is the frustrating part — the fastest fix. I buried my face in my hands when I finally diagnosed it on my own jointer. Two full weeks assuming my knives were shot. They were fine.
The outfeed table needs to sit exactly flush with the top of the knife arc at top dead center. Not approximately flush. Exactly. We’re talking 0.002 inches of tolerance in a serious shop. A hair low and the board tips downward as it exits — scallop at the tail end, every time, no exceptions.
The straightedge test is your fastest diagnostic. Lay something long and reliably flat — a 24-inch steel rule, a table saw fence, a machinist’s straightedge — across both tables so it bridges the cutterhead. Motor off. Now rotate the cutterhead by hand and watch the knife tips at the top of their arc. They should just barely kiss the straightedge. No gap underneath. No upward pressure lifting it. A kiss. That’s it.
Table sitting too low? Turn the handwheel or lever — varies by model — to raise it up, then retest. This single adjustment kills the scalloping in most cases. Immediately.
Table sitting too high? You’ll see scallops across the full board width rather than just the tail. The knives peel wood before the table can support it. Lower and retest.
Most jointer scalloping stops right here. Don’t make my mistake and skip this step.
Inspect and Reseat the Knives
Outfeed table is dialed in and you’re still getting scallops? Knives are next.
Dull knives tear rather than cut. You’ll notice burnished-looking, rough grain alongside that repeating wave pattern — the two show up together. Here’s the kicker: a dull knife looks completely fine under shop lighting. Totally shot under magnification. I’m apparently the kind of person who trusts his eyes too much, and that habit cost me a set of boards I didn’t need to waste.
Uneven knife height is sneakier. One knife sitting 0.010 inches higher than the others does a disproportionate share of the cutting and stamps that same groove into every board. Consistent, repeating, maddening.
The pencil-mark method works well for height checking without specialized tools. Sharpen a pencil and hold it parallel to the cutterhead, lightly touching the knife tips. Roll the cutterhead by hand and check how each knife marks the pencil. Uneven marks mean uneven height — simple as that. A dial indicator mounted to a wooden block is more precise, but the pencil method catches most problems.
Reseating uses the gib screws. Loosen slightly, tap the knife to correct height, retighten. Check again. I’ve seen jointers that looked perfectly aligned that were off by a full step — don’t skip the verification pass.
For genuinely dull knives, just replace them. A set of replacement knives for a standard 6-inch jointer runs $30 to $80 depending on brand. Honing in place is possible — it’s just slower than swapping, and the before-and-after improvement from fresh knives is immediate and obvious.
Slow Down Your Feed Rate
Feeding too fast overloads the knives. Each rotation has to remove more wood than it’s designed to handle, and you get that washboard texture instead of a clean face. This one costs nothing to fix and takes zero adjustments — which is exactly why it’s easy to overlook.
Rough practical numbers: hardwoods like oak and maple do best around 15 to 20 feet per minute. Softer stuff — pine, poplar — can handle 25 to 30. Hand-fed jointers have no readout, so you’re going by feel. If you’re physically muscling the board through or the motor pitch changes, you’re moving too fast. Ease up.
Feeding against the grain makes feed-rate scalloping dramatically worse — you’re fighting upward grain fibers at the same time the knives are already struggling. Flip the board. Feed with the grain. Even if it means an extra pass, the surface comes out cleaner and you’re not loading the knives unnecessarily.
Still Scalloping After All That?
If your outfeed table is dialed, knives are fresh and evenly set, and your feed rate is reasonable — and the scalloping persists — you’re looking at a mechanical problem. That changes the conversation.
With the motor off, grab the cutterhead and try rocking it perpendicular to the shaft. Any detectable movement means worn bearings. That’s a repair-shop job unless you’re genuinely comfortable working with pulleys, shims, and pressed bearings. Most people aren’t, and that’s fine.
A warped infeed table can also produce repeating scallops — the board isn’t making consistent contact on the approach, so the cut depth varies. Rare, honestly, and hard to confirm without precision straightedges. If you’re seeing it, the table needs machining.
One overlooked quick fix: blow out the gib area with compressed air. Sawdust and old shavings pack under the knife gibs and quietly push a knife out of alignment. Takes thirty seconds and occasionally that’s genuinely all it takes.
Here’s the reassurance: if the first three fixes don’t solve your scalloping, the machine has a mechanical issue — not a technique issue. But the overwhelming majority of scalloping cases die at the outfeed table. Start there, run the straightedge test, and you’ll probably have your answer in under five minutes.


Stay in the loop
Get the latest wood working workshop updates delivered to your inbox.