Why Band Saw Blades Drift in the First Place
Band saw drift has gotten complicated with all the conflicting advice flying around online. Everyone’s got a theory. The fence is wrong. The saw is cheap. Buy a new blade. Meanwhile, you’re standing there watching your cut wander left and wondering if you just wasted four hundred dollars on a machine that doesn’t work.
It works. Probably.
As someone who spent two full years making the exact same mistake on a 14-inch Grizzly G0555, I learned everything there is to know about blade drift the hard way. Today, I’ll share it all with you — including the part where I burned through three perfectly good blades before figuring out what was actually wrong.
Drift — that sideways creep that ruins straight cuts and throws your fence angle completely off — comes down to three things. Blade tension that’s too low. Guides that got nudged out of position and forgotten. Or a blade with uneven set that’s physically incapable of cutting straight, no matter how hard you fight it. That’s it. Three culprits. All fixable.
Most of us inherit bad habits from whoever first handed us the saw. Tension gets ignored because nobody mentions it. Guides get adjusted once and never touched again. Then we blame the machine for being junk. Don’t make my mistake.
The good news: you almost never need a new saw. Fifteen minutes and a straight answer about which thing is broken — that’s usually all this takes.
Check Blade Tension Before Anything Else
Start here. Seriously. Under-tensioned blades are responsible for the majority of drift problems, and fixing tension costs you nothing.
Here’s the method I use. Release the tension handle so the blade goes completely slack — you should be able to push it around with a finger. Then crank the tension back up until it feels snug. Now comes the actual test. Push the blade sideways at the midpoint between the wheels, hard but not recklessly, with one finger. A properly tensioned blade deflects no more than a quarter inch. About the thickness of a standard pencil.
Half an inch of movement? You’re under-tensioned. Keep cranking.
The tension gauge on your saw is, bluntly, a liar. Most band saws ship with a dial that reads tension in pounds per inch of blade width. Those numbers are marketing fiction — they’re based on ideal conditions that don’t exist in a real shop. The quarter-inch deflection test is what actually matters. I spent three hours adjusting guides that were perfectly fine before I figured that out. The tension was the problem the whole time.
Once you hit that sweet spot, note where the tension lever sits physically. Every blade change, you’ll return to roughly that same position and verify with the deflection test. Takes thirty seconds.
Re-tensioning alone fixes blade drift in most cases — at least if the guides haven’t been completely neglected. Give this step a real chance before moving on. Don’t skim it because you want to get to the “real” problem. This is the real problem, more often than not.
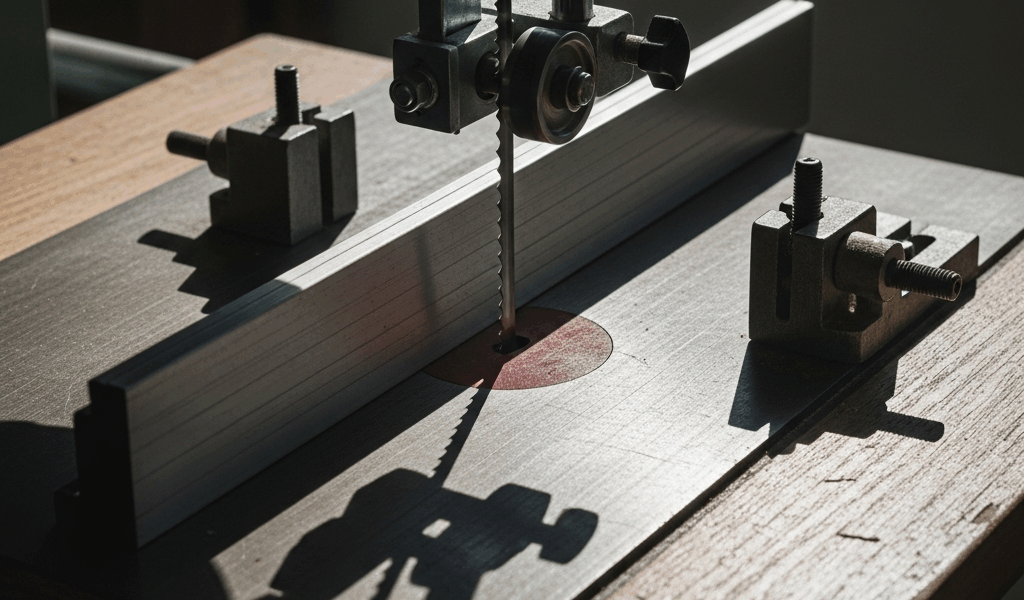
Align Your Blade Guides Top and Bottom
Guides do two jobs: stop the blade from wandering sideways under load, and prevent it from twisting. Too loose and the blade wanders. Too tight and you’re burning blade steel and cooking your motor. Neither outcome is great.
Most band saws — including the Grizzly, the Jet 14-inch, and most Ridgid models — have two sets of guides to deal with: the side guides and the thrust bearing.
Side Guides—The Positioning Rule
Side guides should sit just behind the gullets of the teeth. Not touching the teeth. The gap between guide face and blade body should be paper-thin — literally the thickness of a sheet of standard 20-lb copy paper. Can’t slide the paper through? Too tight. Can you fit a pencil? Too loose.
You’ll adjust this at both guide assemblies, top and bottom. Loosen the mounting bolt slightly, position the guide, check your gap with actual paper, tighten. Repeat at the lower block. Both matter equally and most people only do the top.
Probably should have opened with this warning, honestly: I cranked my side guides down like they were clamping the blade in a vice. Burned through three blades in six weeks thinking they’d gone dull. They weren’t dull — I was strangling them.
Thrust Bearing—Keep it Clear
The thrust bearing lives behind the blade and stops it from pushing backward during a cut. At rest, it should not touch the blade body at all. Spin it by hand — it should spin freely, zero drag. Then push the blade back gently with one finger; the bearing should just barely kiss the blade at that moment and no sooner.
If the bearing drags against the blade while the saw sits idle, back it off a quarter turn and recheck. Do this top and bottom. Both assemblies. Every time you swap blades.
Angle the Fence to Compensate for Lead
So you’ve tensioned the blade correctly. The guides are set right, paper-gap verified. The blade still drifts during freehand cuts.
That’s blade lead. It’s real, it’s not a defect, and fighting it will only make your cuts worse.
Blade lead happens when the teeth are ground or set unevenly from the factory — or from wear. The blade naturally wants to travel at a slight diagonal even when you’re pushing dead straight. That’s what makes band saws endearing to us woodworkers, honestly: they’ve got opinions.
Here’s the fix. Make a freehand rip cut on scrap — something cheap, pine or poplar — and don’t force it straight. Let the blade go where it wants. Watch the kerf angle. Now take a pencil and mark that angle directly on your fence. If the blade wants to drift twelve degrees to the right, your fence goes twelve degrees to the right. On the next cut, run your stock against that angled fence. The blade drifts exactly the same direction it always did, but now you’re actually cutting the line you intended.
I kept a Bosch 3/8-inch blade running an extra six months doing exactly this. The blade had developed some lead but wasn’t remotely done cutting. Accepting the drift instead of fighting it extended its useful life considerably.
When to Just Replace the Blade
If tension is correct, guides are dialed in, and fence compensation doesn’t solve it — the blade is done. That’s the answer.
Look for these signals: burn marks on the cut surface, the blade feels genuinely hot after five minutes of light cutting, or you’re pushing stock through with noticeably more force than usual. Dull blades don’t drift because they’re lazy. They wander because they’re chewing material sideways instead of shearing it cleanly, and that friction physically pulls the blade off its line.
Sharpening services exist. I’m apparently bad at finding reliable ones, and buying new blades works for me while resharpening never quite does. A decent 3/8-inch skip-tooth blade runs fifteen to twenty dollars at most woodworking suppliers. Your time costs more than that.
But here’s the reassurance: blade drift is almost always fixable without spending a dime. Tension first, then guides, then fence angle compensation. One of those three fixes it every time. So, without further ado — go check that tension deflection. Quarter inch. That’s your number.


Stay in the loop
Get the latest wood working workshop updates delivered to your inbox.