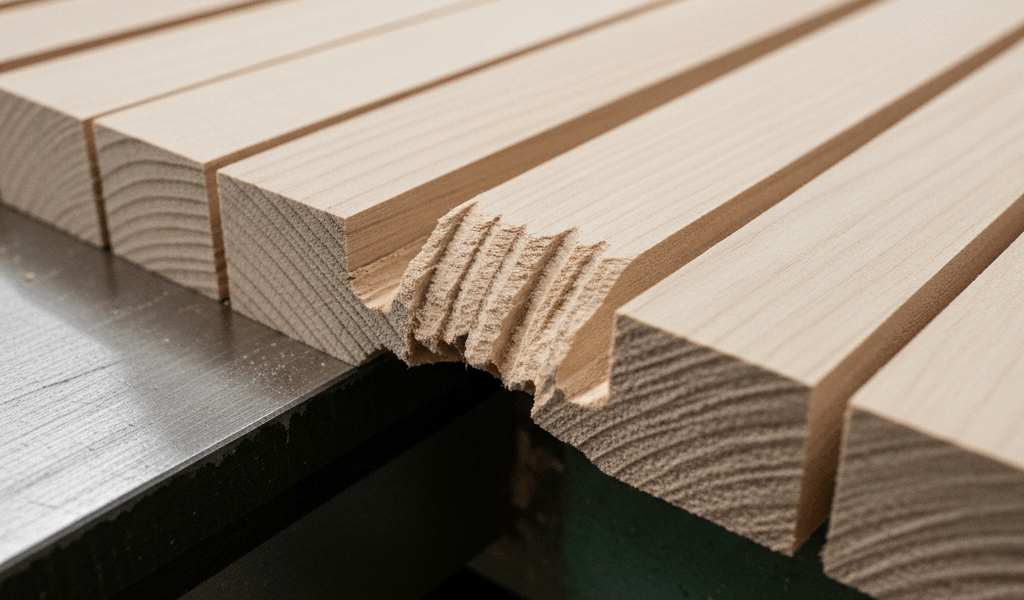
What Snipe Actually Is and Why It Happens
Planer snipe has gotten complicated with all the misinformation flying around. People buy a benchtop planer, see that shallow gouge at the start or end of their board, and immediately assume something’s broken. I see it constantly — forums, comment sections, DMs from woodworkers who just unboxed a brand-new machine and want to return it.
Nothing’s broken. Here’s the actual situation: your board enters the planer before it’s making contact with every support surface available. The infeed roller and cutterhead grab it, sure — but the bed underneath hasn’t fully caught the board yet. So it tips. Barely. Maybe a sixteenth of an inch, maybe less. That tiny angular shift changes the cut depth for a split second, and the knives bite harder than they should. Then the same thing happens in reverse on the exit — board loses support, tilts upward as the outfeed roller lets go. The knives catch one final time.
That’s snipe. Pure geometry. And it’s fixable.
Check These Three Things Before You Change Any Settings
Probably should have opened with this section, honestly. Most woodworkers head straight for the adjustment bolts when they should be asking questions first.
Where Is the Snipe Appearing?
Lead end only? Trail end only? Both ends? Location tells you everything about what’s actually failing. Snipe only at the front usually means your infeed support is weak — or you’re not feeding the board in straight. Snipe only at the back means the exit isn’t supported. Both ends showing up? That’s almost always technique, not machine.
Is the Snipe Consistent or Random?
Run the same board twice. Does snipe land in the same spot both times? That’s a machine issue — roller out of alignment, loose gib, something physical you can actually fix. Does it show up in different places, or disappear entirely on your third pass? Feed technique problem. That’s what I see most of the time, honestly. Nine times out of ten.
Are You Supporting the Board on Entry and Exit?
This is the diagnostic that actually matters. Does your infeed table extend at least 12 inches in front of the planer mouth? Does something — a table, a roller stand, anything — catch the board as it exits? No support on both sides and you’ve already found your culprit. The board tilts because nothing’s holding it level.
I spent three months chasing machine adjustments on my old DeWalt DW735 — seriously, three months — before realizing my infeed table was sitting 8 inches back from the planer mouth. The board was already tipping before it ever reached the knives. Don’t make my mistake.
How to Fix Snipe With Feed Technique Alone
This is where most snipe actually dies. Not buried in your adjustment manual. In how you physically feed the wood.
Support Both Ends
Build infeed and outfeed tables that sit flush with your planer bed — or a hair above it. Minimum 12 to 18 inches of extension on each side. Working with boards over 5 feet long? Get a roller stand on the outfeed side. A $39 roller stand from Harbor Freight genuinely beats $200 worth of machine modifications. Board stays flat. Snipe stops. That’s the whole story.
Lift the Trailing End Slightly as It Exits
This hand technique works immediately — first try, every time. As the board moves into its last 6 inches of travel, rest your hand lightly on the trailing end. Not gripping it. Just resting there with gentle upward pressure. You’re counteracting the natural tilt that happens the moment the outfeed roller releases the board. It exits clean. No final knife bite. No snipe.
Feed Without Gaps or Stops
One board after another. Continuous motion, no breaks. Stop mid-feed and the board just sits there against spinning knives with the infeed roller pressing down — you’re practically inviting a divot when motion resumes. Feed a whole stack end-to-end. The difference shows up on the very first pass.
Let the Machine Do the Work
Don’t muscle the board through. The rollers are handling feed — your hands exist for gentle guidance and exit support, nothing more. The second you start fighting the feed, you’ve changed the board’s angle and introduced snipe yourself. Light touch. Always.
Machine Adjustments That Reduce Snipe
Technique not solving it? Look here. But only here, and only after the fundamentals above are actually dialed in.
Check Bed Roller Height
The infeed bed roller should sit just barely below the cutting circle — roughly 0.010 to 0.015 inches below. Too high and the board rides up and tilts. Too low and it sags mid-cut. Worth checking on any machine that snipes consistently. Loosen the mounting bolts, grab a straightedge, adjust in small increments. Most benchtop planers have slotted mounts — you won’t need to pull the whole assembly apart.
Verify Feed Roller Tension
Uneven roller pressure means uneven grip. One side holds flat, the other lets the board shift. Check your manual for tension specs — adjustment bolts typically sit on both sides of the housing. They should feel equally resistant. Sometimes a quarter turn on one side is genuinely all it takes.
Look for Play in the Head Assembly
Benchtop models develop looseness in the columns and gibs after 50 to 100 hours of use. Push sideways on the cutterhead. Does it move at all? Tighten the gib bolts — usually four of them, two per side. A few careful quarter turns often kills the intermittent snipe that’s been driving you crazy for months.
Accept the Limits of Your Machine
Some benchtop planers — the compact ones, under 12 inches wide, minimal support tables — are just prone to snipe by design. Infeed and outfeed rollers sit too close together. Bed is short. You can reduce snipe through technique and sacrifice boards, but eliminating it entirely isn’t realistic. That’s a machine limitation, not a personal failure. Knowing that saves you from chasing fixes that simply don’t exist.
The Sacrifice Board Trick and When to Use It
You’ve probably heard this one already: butt scrap wood against the front and back of your workpiece so the snipe lands on material you’re throwing away anyway.
It works. Board enters against the scrap, stays flat through the full cut, exits flat. Snipe shows up on the expendable pieces. You pull the sacrificial boards away and your workpiece is clean.
Use this when: you’re running a single valuable board and don’t have time to build proper support tables. When you’re planing figured or expensive lumber where even a small defect ruins everything. When you’re new to the machine and still finding your technique.
Don’t use it as a permanent fix, though. It’s a Band-Aid — a useful one, but still. If sacrifice boards appear on every single pass, your machine or your technique needs actual attention, not concealment.
The fastest path for most people is straightforward: extend the infeed table, add an outfeed roller stand, practice the trailing-end lift. That combination solves snipe in a single day. Everything after that is just refinement.


Stay in the loop
Get the latest wood working workshop updates delivered to your inbox.