What Drill Press Runout Actually Looks Like
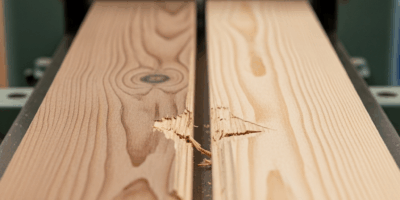
Drill press runout has gotten complicated with all the vague advice flying around. “Tighten the chuck” gets thrown out constantly, and honestly, it misses the point about 60% of the time. I learned that the hard way after boring a wandering hole through a $40 slab of figured walnut — the bit started dead-center, drifted sideways somewhere around the 1-inch mark, and left an oblong mess that no dowel would touch. That was my wake-up call.
Here’s what runout actually looks like in practice. Holes come out oval instead of round. Dowels sit loose and rattle. The bit wobbles visibly at speed — even after you’ve cranked the chuck key until your wrist aches. One side of the hole burns dark brown while the opposite edge looks perfectly clean. On anything over a half-inch bit, you’ll hear a rhythmic ticking, maybe feel a subtle vibration humming through the cast-iron table.
The sneaky part? It doesn’t announce itself. A press can bore clean, tight holes for months — then suddenly start drifting. That’s your signal to stop immediately and figure out what changed. Don’t just assume it’s the chuck. That assumption costs time and good lumber.
The 3-Point Test to Find Where Runout Is Coming From
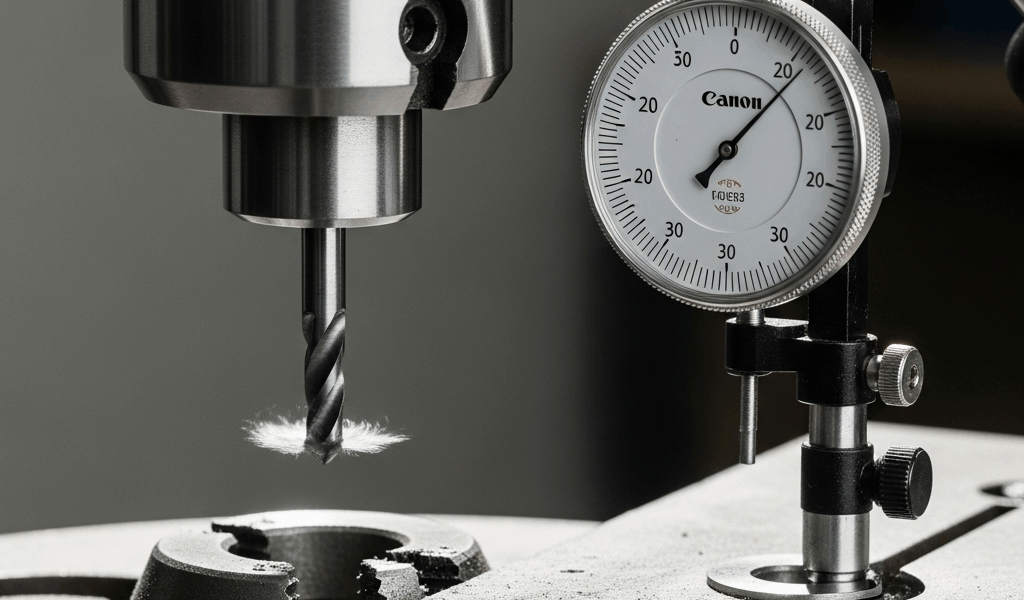
As someone who has chased runout across three different drill presses, I learned everything there is to know about diagnosing it systematically. Today, I will share it all with you. You need a dial indicator — nothing fancy, the $15–$30 ones from any tool supplier work fine. I use a Shars 0.001-inch indicator I picked up for around $22. Does the job.
Step 1: Test the Spindle Taper
This is where most runout actually originates — and you absolutely need this reading before you touch the chuck. Power the machine off completely. Take a clean, straight steel rod — a bare bit shank works perfectly — and seat it into the spindle taper by hand, pushing it fully home. Mount your dial indicator so the probe barely kisses the rod about 2 inches below the spindle nose.
Rotate the spindle slowly by hand. Watch the needle. Anything over 0.005 inches of swing means your taper is the problem. Worn bearings or a bent spindle show up right here, first.
Step 2: Test the Chuck Body
Install the chuck normally. Mount a clean rod inside it — tighten the key at all three positions evenly, not just one. Set up the indicator the same way and rotate by hand again. If this reading stays under 0.005 inches but your spindle test showed runout, the chuck itself is actually fine. It’s just being held at a bad angle by a damaged taper.
If the chuck test shows runout but the spindle test was clean? The chuck is the problem — dirty, worn, or damaged internally.
Step 3: Test the Bit Shank
Install your actual drill bit and test again. A bent shank or a poorly formed bit will show up here and nowhere else. This is the easiest fix in the entire diagnostic process — swap the bit and move on. That’s what makes a systematic test endearing to us woodworkers. No guessing. No replacing parts that don’t need replacing.
Always test in sequence. Skipping straight to the chuck — the most common advice online — means you might clean and reseat a perfectly fine chuck while the real problem sits one layer deeper. Start at the source, work outward.
How to Fix Runout at the Chuck
Nine times out of ten, the problem lives here. The taper where the chuck seats collects sawdust, metal swarf, and dried coolant residue — invisible until you actually pull the chuck off and look directly at it.
Remove the chuck. There are usually four mounting bolts — sometimes three — loosened with the chuck key. Pop it off by hand or tap it free with a soft rubber mallet. Now look at both mating surfaces: the female taper inside the chuck and the male taper on the spindle. Any rust, grit, or debris sitting on those surfaces? That’s your culprit right there.
Wipe both surfaces down with a clean rag. I use mineral spirits — nothing exotic, a $6 bottle from the hardware store works fine. Dry both surfaces completely before doing anything else. This single step fixes runout roughly 40% of the time. Embarrassingly simple.
Now reseat the chuck. Hand-place it onto the spindle taper, then grab a wooden block and a hammer — strike the chuck body sharply, three or four solid blows. Don’t be timid about it. A properly fitted taper needs a confident impact to seat fully. Reinstall the mounting bolts and tighten them in an even, alternating pattern.
Retest with the dial indicator. You should be reading under 0.005 inches now. Still showing runout? The chuck is damaged — cracked body, worn jaw threads, bent key slots. Replace it. A used Jacobs chuck runs $40–$80 depending on size. New ones land around $100–$150.
How to Fix Runout at the Spindle
Probably should have opened with this section, honestly. Spindle problems are rarer but nastier to deal with.
Machine off — grasp the spindle pulley and try to wiggle it side to side. There should be almost zero play. A hair of movement is acceptable. If it rocks noticeably, your bearings are worn. That’s the real issue, not contamination.
Light machine oil in the bearing housings might help temporarily — a few drops, not a flood. Check your manual for the exact location — my old Craftsman 15-inch press has two accessible ports on the head casting. But lubrication buys time at best. It won’t fix a bearing that’s already worn past its tolerance.
Proper bearing replacement is the real fix. On most drill presses it’s a machine shop job — at least if you’re not already comfortable pulling press heads apart. For older machines — I’d say anything over 20 years old — get a quote from a local tool repair shop first. Labor usually runs $80–$200 plus parts. Sometimes buying a used replacement spindle assembly makes more financial sense than the repair bill.
A bent spindle is a different problem entirely — and much rarer. It only happens from a hard drop or impact. Without specialized straightening equipment, it’s not salvageable. Replace the spindle assembly or retire the machine. Don’t make my mistake of spending three weekends trying to coax a bent spindle back into tolerance. It won’t happen.
Mistakes That Make Drill Press Runout Worse
I’m apparently the type of person who has made every one of these errors personally, and systematically identifying them one by one works for me while random online advice never actually solved anything. So without further ado, let’s dive in.
- Using a worn chuck key that doesn’t seat fully. The wedge on old keys rounds off gradually — so gradually you won’t notice until the jaws are tightening unevenly. A replacement key runs $8–$12. Buy one.
- Blaming the machine before inspecting the bit. A dropped bit bends easily and looks completely normal at rest. Spin it by hand and watch the shank closely. A bent shank shows up immediately under a dial indicator. Don’t tear apart your press over a $6 bit.
- Forcing an oversized shank into a standard 3-jaw chuck. It won’t seat properly, period. If the shank diameter exceeds your chuck capacity, you need a larger Jacobs chuck or a different bit — not more force.
- Cleaning the taper once and forgetting about it permanently. Dust accumulates with every cut. Every six months of regular use, pull the chuck and wipe both tapers clean. Takes five minutes. Skipping it means starting this whole diagnostic process over again in another six months.
- Skipping the re-seating strike after cleaning. A dry wooden block strike after cleaning isn’t optional. A taper that’s merely resting on the spindle — not fully seated — will show false runout. Tap it home every single time.
Most runout problems solve cleanly once you know exactly where to look. Run the 3-point indicator test in sequence, fix the layer that’s actually broken, and your press will bore true holes again. You’ll also avoid spending money replacing parts that were never the problem in the first place. Don’t make my mistake.


Stay in the loop
Get the latest wood working workshop updates delivered to your inbox.