“`html
What Causes Planer Snipe and Why It Happens
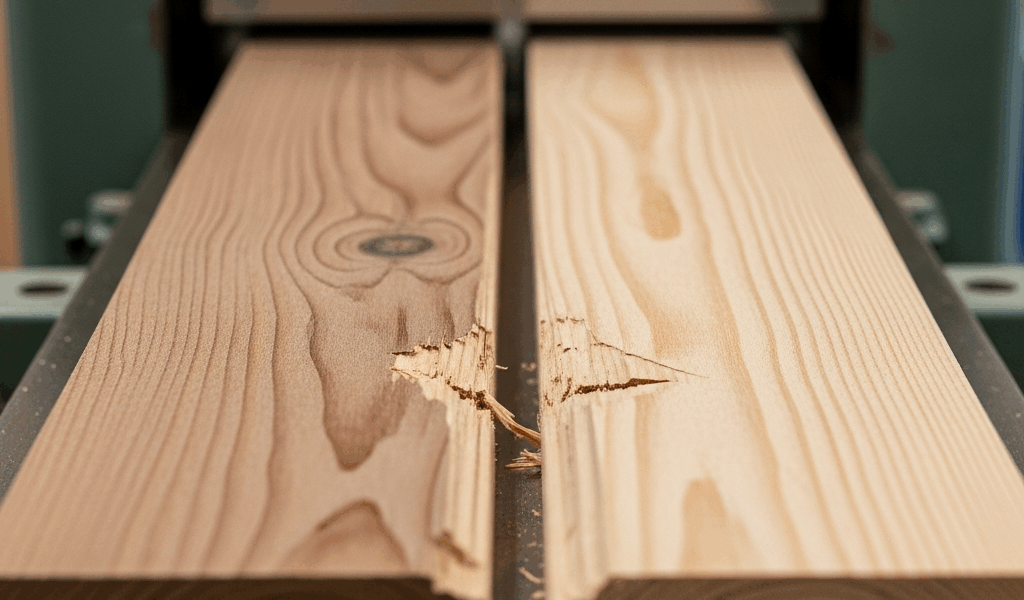
I watched a client’s piece of figured cherry come out of his benchtop planer with a half-inch gouge at the exit end, and honestly, I’d made the same mistake a hundred times before understanding what was actually happening. Planer snipe—that sudden, ugly dip at the leading or trailing edge of your board—isn’t random. It’s mechanical.
Here’s what’s really going on: as a board enters the cutterhead, gravity pulls it downward slightly before the infeed rollers grab it. Same thing at the exit — the board tips down just as the outfeed rollers release it. That dip puts the board’s surface directly into the knife path at a sharper angle than the rest of the cut. The result? A gouge, typically ⅛ to ¼ inch deep depending on feed speed and board thickness.
Both benchtop and stationary planers suffer from this, though benchtop models take the worst hits because their tables lack structural rigidity. The infeed and outfeed tables on most machines aren’t actually connected to the planer’s main body — they’re separate components positioned alongside the cutterhead. That gap between the table and the cutterhead is where snipe lives. Understanding why it happens is the only way to stop it.
This isn’t a design flaw. It’s how planers work. So instead of fighting the machine, you work with it.
Check Your Infeed and Outfeed Table Alignment First
Misaligned tables are responsible for about 80 percent of the snipe I see. Before you buy outfeed supports or change your technique, take twenty minutes to verify your tables are actually coplanar — meaning they sit at exactly the same height as the cutterhead knife arc.
You’ll need a straightedge (a machinist’s rule works perfectly, or grab a 24-inch aluminum straightedge from any hardware store for $12 to $20) and a feeler gauge set or even shim stock. Here’s the process:
- Unplug the planer. Raise the cutterhead to its highest point using the thickness adjustment wheel.
- Place your straightedge across both the infeed table and the cutterhead, spanning from left to right over the knife arc.
- Slide a feeler gauge under the straightedge at the cutterhead. Your target is 0.001 to 0.002 inches gap — basically nothing. If you’ve got a gap thicker than a piece of paper, your infeed table is too low.
- Repeat this for the outfeed table.
Why such tight tolerance? Because a gap of 0.010 inches (the thickness of a thin shim) will cause visible snipe on boards 6 inches or longer. Most planers have adjustment points — usually set screws on the table’s support brackets or shim pockets underneath. Consult your manual for the exact location, but the principle is identical: small clockwise turns raise the table, counterclockwise lowers it.
I once spent three afternoons troubleshooting snipe on a 20-inch planer before realizing the outfeed table had about 0.015 inches of sag in the center from years of boards resting on it. One shim under a single support bracket fixed it completely. Don’t make my mistake.
Probably should have opened with this section, honestly. Most people skip alignment and jump straight to buying stuff. But alignment is free.
Feed Rate and Grain Direction Matter More Than You Think
A fast feed rate doesn’t cause snipe directly, but it amplifies it like you wouldn’t believe. When you’re feeding a 6-foot board through at 20 feet per minute, the leading edge has maybe 0.3 seconds of contact with the infeed rollers before hitting the cutterhead. If those rollers haven’t fully gripped the board, gravity wins. The board dips.
Slow down to 10–12 feet per minute, and the infeed rollers have twice as long to establish downward pressure. On a benchtop planer, I typically use the slowest setting available. Yes, the planing takes longer. That’s not negotiable if you want snipe-free results.
Grain direction creates a hidden problem. If the last few inches of your board have climbing grain — grain angling upward as you approach the exit — those fibers are prone to splintering and gouging under the knife. Run your hand along the edge of the board from one end to the other. Feel resistance when moving in one direction? That’s climbing grain. Feed the board in the opposite direction. It takes five seconds and prevents the planer from chewing into the grain at the worst possible moment.
Figured hardwoods — walnut with wild grain, curly maple, quilted cherry — are inherently snipe-prone. I once planed a board of figured sapele at the slowest speed with perfect table alignment and still got a minor snipe because the grain literally changed direction in the last 2 inches. Sometimes the wood itself is fighting you. Accept this and plan accordingly. Take thinner passes (2–3 thousandths instead of 4–5) through the last few inches.
DIY Outfeed Support Solutions That Actually Work
The single most effective snipe killer for benchtop planers is a proper outfeed support. This doesn’t mean a cheap roller stand from a big-box store. I tested three of those under $50, and two of them sat nearly ¼ inch lower than my planer’s table. That’s an instant snipe generator.
Option 1: Fixed Outfeed Table Extension
Build a simple plywood shelf at the exact height of your planer’s outfeed table. Materials run about $30 (¾-inch birch plywood, 2×4 supports, lag bolts) and you’ll spend an afternoon on it. The board rests on this as it exits. No rolling parts, no height variance. I built one for a DeWalt DW735 using a 24×30-inch platform and bolted it directly to the planer base. Snipe dropped from a consistent ⅛ inch to nearly zero on boards up to 8 feet.
Option 2: Roller Stands with Adjustable Height
If you need mobility, buy or build roller stands with screw-style height adjustment, not pneumatic. A decent pair costs $80–120 new. Here’s the key: position them so the rollers are coplanar with your outfeed table. Use that straightedge again. Cheap stands without precision height control aren’t worth the space they occupy.
Option 3: Support Cradle for Infeed
For the infeed side, a simple V-groove cradle keeps tall or warped boards from tipping. Cut two 2×4s at a shallow angle and bolt them alongside the infeed table. The board nestles into the V and stays level through entry. This is labor-intensive but essential if you’re planing anything thicker than 1 inch or boards with mild cupping.
Option 4: Combination Approach (What Actually Works Best)
Here’s honest advice: combine a fixed outfeed extension with a slow feed rate. The outfeed support alone eliminates 70 percent of snipe on a properly aligned machine. Add the slow feed and you’re at 95 percent. That remaining 5 percent is figured grain you can’t prevent, so you just plane thinner.
Quick Diagnostic Checklist Before You Plane
Print this or bookmark it. Use it every time you encounter snipe:
- ☐ Table alignment verified — Straightedge test done within last week? Feeler gauge shows 0.001–0.002 inches at cutterhead.
- ☐ Outfeed support in place — Fixed table, roller stand, or cradle positioned level with planer tables.
- ☐ Feed rate set to slow — Running at manufacturer’s minimum or 10–12 FPM. Not rushing.
- ☐ Grain direction confirmed — Hand test completed; board oriented so grain angles downward into the planer.
- ☐ Board conditioned — Acclimated to your shop for 48 hours minimum; no wet or freshly milled stock.
- ☐ Machine warmed up — Ran empty for 30 seconds to ensure infeed rollers are engaging at full pressure.
Most snipe isn’t mystifying once you understand the mechanics. It’s a support problem, an alignment problem, or a grain problem — and usually you’re dealing with at least two of those simultaneously. Fix the first two, respect the third, and your outfeed edge will come out clean. I’ve used this exact checklist on everything from a 13-inch benchtop planer to a commercial 24-inch cabinet model, and the results stay consistent. Expensive hardwood deserves a methodical approach, not guesswork.
“`


Stay in the loop
Get the latest wood working workshop updates delivered to your inbox.