“`html
Router Bit Burning Wood Causes and Solutions
Router bit burning wood has gotten complicated with all the conflicting advice flying around online. You’re cruising through an edge profile, and suddenly the bit turns your walnut black or leaves char marks across pine that won’t sand out. I’ve stood exactly where you are, staring at a ruined board and wondering what went wrong. Today, I will share it all with you. The real answer? Almost every router bit burn has a traceable cause—and fixing it doesn’t require new equipment or mysterious woodworking intuition.
Here’s what makes this frustrating: burning happens for multiple different reasons, and most online advice treats them like one generic problem. Dull bits, wrong speed, incorrect feed rate, faulty technique—they all create the same scorched appearance but demand completely different fixes. By the end of this article, you’ll know exactly which one is wrecking your work.
What Router Bit Burning Actually Looks Like
Light scorching and true burning look similar at first glance. They’re not. Understanding the difference tells you whether you’re dealing with a cosmetic hiccup or a sign your bit is actually failing.
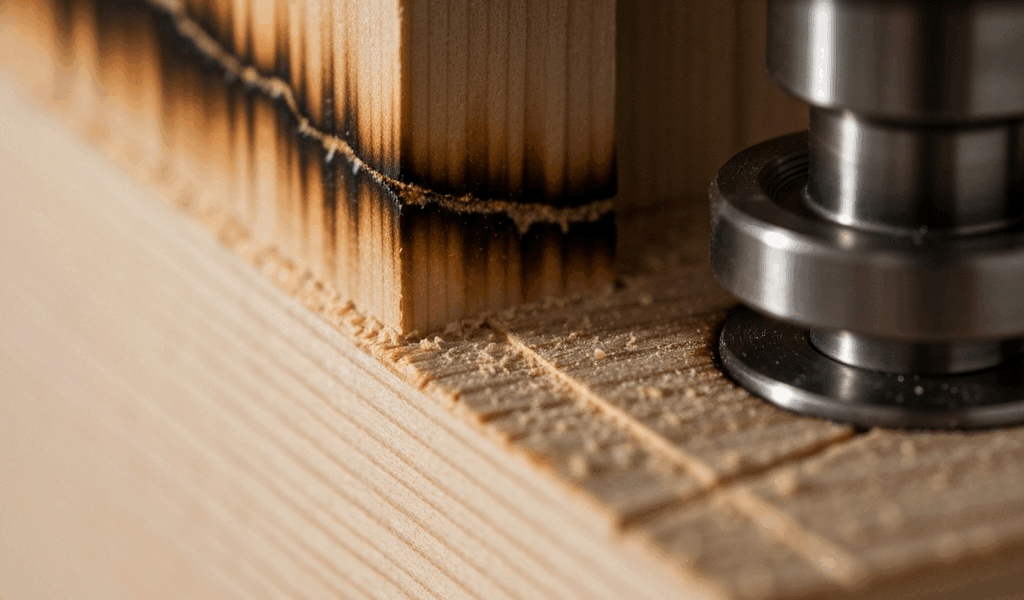
Light scorching appears as thin, tan or light brown lines along the cut edge. Run your finger across it—you feel a slight roughness, but the wood grain is still intact. Sand it out in 30 seconds with 120-grit paper. This usually means your feed rate was just slightly slow, or the bit caught a grain runout. Honestly, it happens to experienced woodworkers constantly. Not a crisis.
True burning shows up as black or deep brown char—sometimes with actual charred wood that crumbles when you touch it. The edge feels crusty. In hardwoods like oak, the grain often separates from the char. This is heat damage, pure and simple. The wood fibers literally scorched. Sand this out and you’ll often find the edge depth is compromised by 1/64 inch or more.
Why this distinction matters: light scorching means adjust one variable and move forward. True burning? That means your bit or technique has a serious problem that will damage every piece you cut until you fix it. One’s a minor adjustment. The other’s a red flag.
Is Your Bit Dull
Frustrated by wood catching on my bits instead of cutting cleanly, I finally learned to inspect them properly. A dull bit creates heat through friction instead of cutting action. Friction equals heat. Heat equals burn. This is the most common cause I’ve encountered—probably because people, myself included more than once, keep using bits well past their useful life.
Visually inspect your bit under shop lighting. Look at the cutting edge closely—use a magnifier if you have one. A sharp bit has a thin, reflective edge that looks almost invisible when you tilt it. A dull bit has a rounded, visible edge that catches light like a tiny bead running along the cutting surface.
Run the paper drag test: hold a piece of copy paper vertically and drag the bit edge across it gently, using thumb pressure. A sharp bit should catch the paper slightly and require noticeable pressure to move through. A dull bit will slip across the paper surface without gripping. If your bit slides across without resistance, it’s dull enough to cause burning — at least if you care about clean cuts.
Another check: run your finger along the flute very lightly. Sharp bits feel almost sharp enough to cut you—not actually dangerous, but with definition. Dull bits feel smooth and rounded. This takes practice to recognize, but once you feel it, you know the difference instantly.
The physics is straightforward. Sharp bits cut material, which is fast. Dull bits sand material through friction, which creates heat. Heat plus wood equals burn marks. There’s no way around this one—a dull 3/4-inch round-over bit will burn almost any wood type at almost any speed.
Check Your Router Speed and Feed Rate
Wrong RPM and feed rate cause about 40% of burning complaints. Probably should have opened with this section, honestly. The good news? They’re the easiest variables to control.
Router manufacturers print speed recommendations right on the bit shank, but most woodworkers ignore them. Don’t. Those numbers exist because wood burns at specific heat thresholds.
Here’s a practical reference covering the most common scenarios:
| Bit Size | Material | Router Type | Recommended RPM | Feed Rate |
|---|---|---|---|---|
| 1/4-inch | Softwood (pine, fir) | Spindle or table | 18,000–24,000 | Steady, moderate push |
| 1/4-inch | Hardwood (oak, maple) | Spindle or table | 12,000–18,000 | Slow, steady push |
| 1/2-inch | Softwood | Table router | 12,000–16,000 | Slow, consistent feed |
| 1/2-inch | Hardwood | Table router | 8,000–12,000 | Very slow, steady push |
| Large bits (3/4″+) | Any wood | Table router | 6,000–10,000 | Slow and measured |
Notice the pattern: bigger bits run slower. Smaller bits run faster. Hardwoods run slower than softwoods. It’s not arbitrary. A 1/2-inch bit at 18,000 RPM creates surface friction that hardens wood fibers instead of cutting them cleanly.
Feed rate is how fast you move the wood through the cut. “Slow and steady” is accurate but vague. What I actually mean: if you’re making a full-profile edge pass, the router should move so gradually that you could comfortably have a conversation while working. If you’re feeding wood past a table-mounted bit, your hand shouldn’t move faster than a few inches per second. That’s the speed.
Too-fast feed rates don’t give the bit time to clear chips, so friction heat builds. Too-slow feed rates can also create problems—the bit spends too much time in contact with the wood, and heat accumulates. The sweet spot feels almost lazy.
Technique Fixes That Stop Burning Immediately
Technique changes can eliminate burning faster than anything else, assuming your bit is sharp and your speed is correct.
Avoid climb cutting. Climb cutting happens when you move the router or wood in the same direction as the bit rotation. This feels smooth at first—the bit almost pulls itself through the cut. Then it catches a grain runout and grabs hard, burning the edge instantly. Worse, it can throw the workpiece or the router violently. Don’t make my mistake. Instead: always feed the wood so the bit rotation works against the feed direction. Clockwise bit? Move wood counterclockwise past it. This forces steady, controlled cutting with zero grabbing.
Follow grain direction. Wood grain runs in a specific direction. Cut with the grain and the bit lifts fibers cleanly. Cut against the grain and you’re forcing fibers backward, which creates friction and heat. Whenever possible, orient your edging so the grain runs downhill in the direction of feed. This alone can cut burning problems by half.
Dust extraction. This one surprised me when I finally understood it. Chips stuck in the cut create a barrier between the bit and fresh wood. The bit then heats accumulated chips instead of cutting fresh fibers, and that heat transfers straight to the wood. I’m apparently someone who underestimated dust collection, and a quality system running while you route makes a visible difference in burn reduction. Not a shop vac either—actual negative pressure from a dedicated system positioned right at the bit works.
When to Replace vs. Sharpen Your Bits
Dull bits need attention. The question is whether to resharpen or buy new.
Resharpening costs usually run $8–$15 per bit, turnaround is 1–2 weeks. New bit costs range from $12 for a basic edge bit up to $60+ for specialized profiles or premium carbide.
The logic: if you have a generic 1/4-inch round-over bit that cost $15 new, resharpening at $12 makes sense only if you’d use it frequently enough to justify the wait. A $40 specialty bit you use monthly? Resharpening is worth it. A $60 cabinet door profile bit you’ve used dozens of times? Absolutely resharpen—you get one or two more sharpening cycles from it before the geometry gets too thin.
One personal lesson: I once spent $40 sharpening a bit that had so much edge wear that resharpening changed its profile slightly. It worked, but the edge came out slightly different than the original. For specialty profiles, this matters. For basic bits, minor shifts are invisible. Factor this into your decision.
Most importantly: don’t wait until burning is severe to act. A bit showing early dullness signs should either be replaced or sharpened immediately. Using a nearly-dull bit is like driving on bald tires—the problem only gets worse, and you’ll damage workpieces along the way.
“`


Stay in the loop
Get the latest wood working workshop updates delivered to your inbox.