“`html
How to Spot Table Saw Blade Wobble
Table saw blade wobble causes anxiety I didn’t know existed until my first serious woodworking setup. You’re standing at your saw, ready to rip a board, and something just feels off. The cut edge looks rough. The blade makes a sound that’s slightly wrong. But is it wobble or just vibration?
Here’s the distinction that matters: vibration is whole-machine movement, usually from an unbalanced blade or motor resonance. Wobble, though — that’s the blade tilting or moving side-to-side as it spins. Like a coin rolling on its edge instead of standing flat.
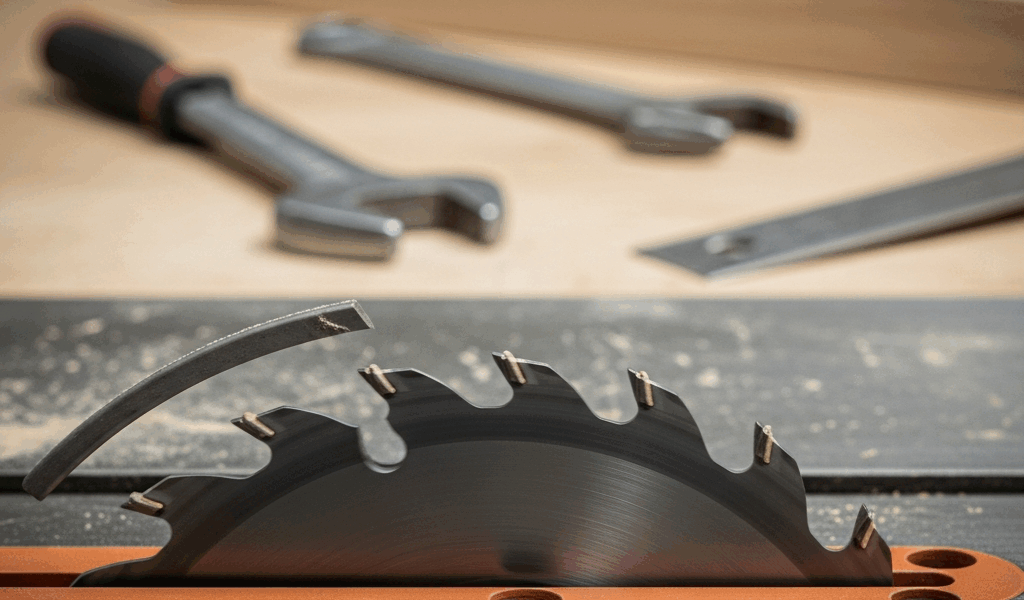
Spotting wobble requires two simple observations. First, look at the blade edge-on from the side while it’s completely stopped and unplugged. A wobbling blade will appear to rock slightly when you look perpendicular to its face. The top shouldn’t look different from the bottom. If the blade face looks straight across, that’s good.
Second, feel the cut quality. A blade with lateral wobble produces edges that look torn or uneven — think of a router bit that’s slightly bent, except you’re seeing it on every tooth of every pass. The cut won’t be smooth. This impacts safety too; wobble adds unpredictable sideways force on the blade, making kickback more likely and binding more severe.
To diagnose safely, I use my thumb. With the blade off and the arbor locked (using the blade-lock mechanism if your saw has one), I press my thumb gently against the blade edge at three or four points around the circumference. A healthy blade stays centered and feels consistent. One that wobbles will push in and out as you move your thumb around. The resistance changes — that’s the telltale sign.
Probably should have opened with this section, honestly. I wasted two weeks assuming my cuts were bad because of technique when it was just a loose arbor nut.
Fix 1 — Tighten the Arbor Nut (Do This First)
Forty percent of wobble complaints? They solve with an arbor nut that’s not tight enough. This fix takes ten minutes and requires only the wrench that came with your saw.
First, unplug the saw. Really unplug it — pull the cord from the wall, don’t just flip the switch. Blade locks should engage automatically once you pull the blade cartridge out; if your saw doesn’t have one, you’ll use two wrenches to hold the arbor from spinning.
Most saws use a 5/8-inch arbor nut or a 3/4-inch depending on the arbor size. Check your manual if you’re uncertain. The nut threads onto the right side of the arbor (when looking from the front of the saw), and it unscrews counterclockwise to come off — that’s the opposite of what most people expect.
Remove the nut completely and set it aside. Now examine the contact surfaces underneath. The nut threads onto a shoulder on the arbor, and there’s a washer or flange underneath it. Clean away any dust, sawdust, or debris from these surfaces. If you see rust or corrosion, use a rag with a little light oil to polish it clean. Contamination prevents the nut from seating flush, which directly causes wobble.
Reinstall the nut by hand first, threading it clockwise until you feel resistance. Now grab your wrench. The torque specification matters here — most saws want between 25 and 50 foot-pounds of torque. My DeWalt calls for 40 foot-pounds; my old Jet wanted 30. Your manual will tell you what yours needs.
If you don’t have a torque wrench, use the feel test. You want snug — firm enough that the blade doesn’t shift when you push on it, but not so tight that you’re using all your strength. Most people overtighten here, especially after they’ve already had a wobble problem. That’s the mistake I made; I cranked that nut down with everything I had, convinced that more force meant more security. It doesn’t. Overtightening bends the arbor shoulder or damages the nut threads.
After tightening, reinstall the blade and spin it by hand. It should rotate freely without any stuttering or hesitation. Then run the saw for 30 seconds in short bursts and listen.
Fix 2 — Check Your Blade Flanges and Inserts
The flanges are the metal rings that clamp the blade to the arbor — one above the blade, one below. They look like thin washers, usually aluminum or steel. Critical for blade alignment.
With the blade removed, inspect both flanges carefully. A bent or dented flange will push the blade out of center, creating wobble that no amount of nut-tightening fixes. Look for visible dents, warping, or uneven surfaces. Run your finger across the face — it should feel completely flat and smooth.
Debris matters too. Sawdust and resin buildup in the flange grooves prevent the blade from sitting flush. I found a wood chip embedded in a groove once, maybe 1/8-inch thick, and it created enough offset to make a 1/32-inch wobble. Clean the grooves thoroughly with a brass brush or old toothbrush.
Some saws have removable blade inserts — plastic or metal rings that sit between the flange and blade. Check if yours are cracked, warped, or missing altogether. Missing inserts are actually common; people remove them accidentally during blade changes. Replacement inserts cost $3 to $12 depending on your saw model.
If a flange is visibly damaged — bent like a taco or dented enough that you can catch your fingernail in it — replacement is the right call. Genuine replacement flanges run $15 to $40 per flange depending on the manufacturer. That’s cheaper than a bad cut or a blade catching sideways during a rip.
Don’t sand or file damaged flanges flat yourself. I tried this once with an old saw, and I ended up making it worse. The metal needs to be precision-flat, and hand tools won’t achieve that reliably.
Fix 3 — Test Your Blade for Warping
A warped blade creates identical wobble symptoms to loose nuts or damaged flanges, but the solution is completely different — you need a new blade. No tightening fixes this.
Detecting warp without a dial indicator is straightforward. With the blade removed and laid flat on a clean, level surface like a table, place a straightedge across the blade face from edge to edge. A good blade will have the straightedge sitting flat against it with no light gaps. If light shows underneath at any point, the blade has concave warp. If the straightedge rocks on the blade instead of resting flat, you’ve got convex warp.
Visual inspection works too. Look at the blade edge-on from the side. A warped blade looks slightly curved or tilted across its diameter. A straight blade forms a perfect vertical line.
The water-drop test works for smaller warps. Fill a spray bottle with water and mist the blade face. If the water beads sit on a flat surface, the blade is flat. If droplets spread out or slide to low spots, the blade has warping.
Certain blade types warp more easily than cheaper ones. Thin-kerf blades are more prone to warping than standard blades because they have less material to maintain rigidity. Combination blades and ripping blades handle warping better because of their tooth design and mass distribution.
Replacement blades range from $25 for a basic 10-inch blade to $150+ for premium carbide-tipped models. A quality Freud or Forrest blade costs around $60 to $80 and lasts much longer than budget options. It’s worth the premium if you’re dealing with warping — better blade durability beats repeated replacement.
Fix 4 — Inspect the Arbor for Play or Damage
Worn out by chasing the other three fixes and still seeing wobble? The arbor itself might be damaged. This is where the troubleshooting gets harder and potentially more expensive.
Lock the blade or use two wrenches to hold the arbor from rotating. Grab the blade by its body (never touch the teeth) and try to wiggle it side-to-side without rotating the saw. There should be almost no movement at all — maybe a hairline of play is acceptable, but anything more than that indicates arbor wear.
Also try pushing the blade forward and backward along the arbor axis. Again, minimal play is normal, but obvious shifting means the bearings are worn or the arbor shaft is bent.
Bent arbors happen from impact — dropping a blade, running something too hard through the saw, or an aggressive bind. The arbor looks straight to the naked eye most of the time, but even a small bend (less than 1/32 inch) creates noticeable wobble at the blade edge.
Bearing failure is the most common arbor-related cause. Table saw bearings take serious abuse — constant rotation under load, dust, heat, and vibration. When they wear out, the arbor develops play that no amount of nut-tightening prevents. You’ll often hear a grinding or scraping sound before you see wobble.
Replacing bearings on a table saw is a DIY job if you have some mechanical confidence and the right tools — you’ll need a bearing puller, likely a press or vice, and your specific bearing specifications from the manual. It costs $40 to $100 in parts and takes 2 to 4 hours depending on your saw design.
Most makers at this stage call a professional. Table saw service at a local repair shop runs $150 to $300 in labor, plus parts. Compare that against the value of your time and the risk of reassembling something wrong and ending up with a dangerous saw.
Track down a local saw service center first. You’ll pay for a diagnosis, but it’s the fastest way to know if you’ve got a bent arbor or bearing failure. Then you can decide whether to DIY or hand it off.
“`


Stay in the loop
Get the latest wood working workshop updates delivered to your inbox.